新年新人新气象 | Rust 学习笔记
作者:李大狗(李骜华)/ 后期编辑: 张汉东
本系列所有源码:
https://github.com/leeduckgo/Rust-Study
新年新目标
打算在 2021 年学习一门新的编程语言,Rust 是一个很好的标的,一方面它及其具备实用性;另一个方面它也能让我们在更高的层面上理解计算机。
本系列将是我从Rust小学生开始的Rust学习过程全记录。
话不多说,我们开整。
由于是一门新的语言(相对 Java),所以传统的到网上去找一本好的入门教材的方法失效了。
那我们就来康康 Rust 能做什么有趣的事情,有什么有趣的Repo。
Substrate(Polkadot公链)、Libra(Facebook链)、WeDPR(FISCO BCOS 隐私保护组件)都是用 Rust 写的,不过评估一下,这些 Repo 的难度太高了,不适合用来作为语言入门。
后来发现 Rust 在 WebAssembly 方面目前进展很不错:
WebAssembly是一种新的编码方式,可以在现代的网络浏览器中运行 - 它是一种低级的类汇编语言,具有紧凑的二进制格式,可以接近原生的性能运行,并为诸如C / C ++等语言提供一个编译目标,以便它们可以在Web上运行。它也被设计为可以与JavaScript共存,允许两者一起工作。
简而言之
对于网络平台而言,WebAssembly具有巨大的意义——它提供了一条途径,以使得以各种语言编写的代码都可以以接近原生的速度在Web中运行。在这种情况下,以前无法以此方式运行的客户端软件都将可以运行在Web中。

所以,Rust 的学习路线就这么定下来了,从wasm开始!
检索实例
既然确定了目标,那么可以开始检索相应的实例。这个实例有两个条件:
- 光有文章是不行的,必须配套相应的的源码
- 这个源码必须足够简洁,适合用来入门
经过一番检索,最后找到了这个:
项目代码:
https://github.com/RodionChachura/rust-js-snake-game/
运行地址:
https://rodionchachura.github.io/rust-js-snake-game/
教程地址:
https://geekrodion.com/blog/rustsnake
git clone 下来,运行了试试,的确可以。
但感觉不是我想要的,因为前端代码的内容太多了。
然后打开官方教程:
https://developer.mozilla.org/zh-CN/docs/WebAssembly/Rust_to_wasm
看到:
Rust 和 WebAssembly 有两大主要用例:
- 构建完整应用 —— 整个 Web 应用都基于 Rust 开发!
- 构建应用的组成部分 —— 在现存的 JavaScript 前端中使用 Rust。
目前,Rust 团队正专注于第二种用例,因此我们也将着重介绍它。对于第一种用例,可以参阅
yew这类项目。
Yep,感觉我需要的是yew!
Yew 的探索之旅
首先找到 yew的官网:
Yew is a modern Rust framework for creating multi-threaded front-end web apps with WebAssembly.
https://github.com/yewstack/yew
找到它官方的例子:
https://yew.rs/docs/zh-CN/getting-started/build-a-sample-app
结果,运行报错……
cargo-web is not compatible with web-sys.
遇到问题,第一时间,当然是到官方Repo里去检索啦,然后就搜到这么一条 Issue:
https://github.com/yewstack/yew/issues/1081

建议使用 trunk,妥~
Trunk 的探索之旅
跳转到 Trunk Repo:
https://github.com/thedodd/trunk
发现里面有examples,于是直接 clone 下来运行:

执行没问题,很好!
但是只有一个简单的实例,没法基于这个进行学习,怎么办?
我们回到 yew 的 Repo 里面,看下有没啥实例。
https://github.com/yewstack/yew/tree/master/examples
Examples 很多,也都能跑通,赞:

魔改出 Base64 Encoder!
在入门一个新的计算机技术的时候,千万不要一开始就从0到1!因为从0到1的难度对新手来说太高。最开始应该先去魔改一个已有的项目。
我选择的是todomvc,原始是长这样:

目的是把它修改成一个 Base64-Encoder:

Ok,那我们来看看原始代码:
#![allow(unused)]
fn main() {
......
    fn view(&self) -> Html {
        let hidden_class = if self.state.entries.is_empty() {
            "hidden"
        } else {
            ""
        };
        html! {
            <div class="todomvc-wrapper">
                <section class="todoapp">
                    <header class="header">
                        <h1>{ "todos" }</h1>
                        { self.view_input() }
                    </header>
                    <section class=classes!("main", hidden_class)>
                        <input
                            type="checkbox"
                            class="toggle-all"
                            id="toggle-all"
                            checked=self.state.is_all_completed()
                            onclick=self.link.callback(|_| Msg::ToggleAll)
                        />
                        <label for="toggle-all" />
                        <ul class="todo-list">
                            { for self.state.entries.iter().filter(|e| self.state.filter.fits(e)).enumerate().map(|e| self.view_entry(e)) }
                        </ul>
                    </section>
                    <footer class=classes!("footer", hidden_class)>
                        <span class="todo-count">
                            <strong>{ self.state.total() }</strong>
                            { " item(s) left" }
                        </span>
                        <ul class="filters">
                            { for Filter::iter().map(|flt| self.view_filter(flt)) }
                        </ul>
                        <button class="clear-completed" onclick=self.link.callback(|_| Msg::ClearCompleted)>
                            { format!("Clear completed ({})", self.state.total_completed()) }
                        </button>
                    </footer>
                </section>
                <footer class="info">
                    <p>{ "Double-click to edit a todo" }</p>
                    <p>{ "Written by " }<a href="https://github.com/DenisKolodin/" target="_blank">{ "Denis Kolodin" }</a></p>
                    <p>{ "Part of " }<a href="http://todomvc.com/" target="_blank">{ "TodoMVC" }</a></p>
                </footer>
            </div>
        }
    }
}
......
}
挺好,这个就是前端部分了,我们把它删减一下:
#![allow(unused)]
fn main() {
    fn view(&self) -> Html {
        let hidden_class = if self.state.entries.is_empty() {
            "hidden"
        } else {
            ""
        };
        html! {
            <div class="todomvc-wrapper">
                <h1>{ "encode/decode" }</h1>
                { self.view_input() }
                <section class=classes!("main", hidden_class)>
                    <ul class="todo-list">
                        { for self.state.entries.iter().filter(|e| self.state.filter.fits(e)).enumerate().map(|e| self.view_entry(e)) }
                    </ul>
                </section>
            </div>
        }
    }
}
我们可以看到,输入的逻辑在view_input()这个地方,于是我们找到那个函数:
#![allow(unused)]
fn main() {
fn view_input(&self) -> Html {
        html! {
            // You can use standard Rust comments. One line:
            // <li></li>
            <input
                class="new-todo"
          			// 改掉replaceholder
                placeholder="What needs to be encode/decode?"
                value=&self.state.value
                oninput=self.link.callback(|e: InputData| Msg::Update(e.value))
                onkeypress=self.link.batch_callback(|e: KeyboardEvent| {
                    if e.key() == "Enter" { Some(Msg::Add) } else { None }
                })
            />
            /* Or multiline:
            <ul>
                <li></li>
            </ul>
            */
        }
    }
}
再找到Msg::Add:
#![allow(unused)]
fn main() {
fn update(&mut self, msg: Self::Message) -> ShouldRender {
        match msg {
            Msg::Add => {
                //info!("add things");
                let description = self.state.value.trim();
                let description_handled = format!("{}: {}", description, encode(description.to_string()));

                if !description.is_empty() {
                    let entry = Entry {
                        description: description_handled,
                        completed: false,
                        editing: false,
                    };
                    //info!("{}", entry.description);
                    self.state.entries.push(entry);
                }
                self.state.value = "".to_string();
            }
......
}
这个时候,我想先调试一下,因此需要把一些数据打印出来。
这个时候,首先想到的是print大法:
#![allow(unused)]
fn main() {
println!("Input: {}", val);
}
但是,在trunk serve命令中,println!这个函数失效了!
在trunk和yew的 Repo 中进行检索,均未找到解决方案。
但是随即发现yew有 Discord Chatroom,于是乎进去搜索聊天记录。

Yummy,这里提到只要使用wasm-logger即可。
https://crates.io/crates/wasm-logger
在项目里添加wasm-logger:
......
// in the first of main.rs
#[macro_use] extern crate log;
......
fn main() {
		// init wasm logger!
    wasm_logger::init(wasm_logger::Config::default());
    yew::start_app::<Model>();
}
调用试试看:
#![allow(unused)]
fn main() {
fn update(&mut self, msg: Self::Message) -> ShouldRender {
        match msg {
            Msg::Add => {
                info!("add things");
......
}
妥了!

接下来找到Rust Base64 的库,调用之(修改的地方用new标出了):
#![allow(unused)]
fn main() {
......
use base64::{encode, decode};
......
fn update(&mut self, msg: Self::Message) -> ShouldRender {
        match msg {
            Msg::Add => {
                // new
                info!("add things");
                let description = self.state.value.trim();
                // new
                let description_handled = format!("{}: {}", description, encode(description.to_string()));

                if !description.is_empty() {
                    let entry = Entry {
                      	// new
                        description: description_handled,
                        completed: false,
                        editing: false,
                    };
                  	// new
                    info!("{}", entry.description);
                    self.state.entries.push(entry);
                }
                self.state.value = "".to_string();
            }
}
运行之。
Okay,Base64-Encoder就做好了!
效果:

Cargo.toml最后长这样:
#![allow(unused)]
fn main() {
[package]
name = "encoder"
version = "0.1.0"
authors = ["Denis Kolodin <deniskolodin@gmail.com>"]
edition = "2018"

[dependencies]
strum = "0.20"
strum_macros = "0.20"
serde = "1"
serde_derive = "1"
yew = { path = "./packages/yew" }
yew-services = { path = "./packages/yew-services" }

log = "0.4.6"
wasm-logger = "0.2.0"
base64 = "0.13.0"
}
生成 ETH 公私钥与地址
本系列所有源码:
https://github.com/leeduckgo/Rust-Study
本篇是 Rust 学习笔记的第二篇。在第一篇里,我们魔改出了一个 Encoder,现在我们继续延续我们的魔改之路,挑战一个难度+1的Repo:
Rust library for generating cryptocurrency wallets
https://github.com/AleoHQ/wagyu
魔改目标 0x1:
抽取 Repo 中以太坊私钥、公钥、地址生成的部分,打印到控制台中。
但在魔改之前,笔者首先要对上一篇文章稍作补充,总结一下上篇文章中所涉及的知识点。
上篇文章中所涉及的知识点
- 变量的赋值
- format!函数(连接字符串)
- 库的添加与使用,以wasm-logger为例
- trunk 与 yew 结合,让Rust程序 wasm 化,使其在浏览器中可访问
跑一遍 wagyu
首先要验证这个库符合我们的需求,所以按照 Repo 中的 Readme,采用源码的方式跑一遍。
# Download the source code
git clone https://github.com/AleoHQ/wagyu
cd wagyu

# Build in release mode
$ cargo build --release
./target/release/wagyu
成功:

在这个过程里,我们学习到了 cargo 的更多用法:
$ cargo run # 直接执行
$ cargo build # build 出 debug 版本,可执行文件在 ./target/debug 目录下
$ cargo build --release # build 出 正式版本(release version),可执行文件在 ./target/release 下
研究 wagyu 代码
首先喵一眼目录结构:
.
├── AUTHORS
├── Cargo.lock
├── Cargo.toml
├── LICENSE-APACHE
├── LICENSE-MIT
├── README.md
├── bitcoin
├── ethereum
├── model
├── monero
├── target
├── zcash
└── wagyu
      ├── cli
      │   ├── bitcoin.rs
      │   ├── ethereum.rs
      │   ├── mod.rs
      │   ├── monero.rs
      │   ├── parameters
      │   └── zcash.rs
      ├── lib.rs
      └── main.rs
我们可以看到,主入口是wagyu。
在wagyu的main.rs中,会对cli目录下的子模块进行调用,进而对和cli平级的子模块进行调用。
其代码如下:
fn main() -> Result<(), CLIError> {
    let arguments = App::new("wagyu")
        .version("v0.6.3")
        .about("Generate a wallet for Bitcoin, Ethereum, Monero, and Zcash")
        .author("Aleo <hello@aleo.org>")
        .settings(&[
            AppSettings::ColoredHelp,
            AppSettings::DisableHelpSubcommand,
            AppSettings::DisableVersion,
            AppSettings::SubcommandRequiredElseHelp,
        ])
        .subcommands(vec![
            BitcoinCLI::new(),
            EthereumCLI::new(),
            MoneroCLI::new(),
            ZcashCLI::new(),
        ])
        .set_term_width(0)
        .get_matches();

    match arguments.subcommand() {
        ("bitcoin", Some(arguments)) => BitcoinCLI::print(BitcoinCLI::parse(arguments)?),
        ("ethereum", Some(arguments)) => EthereumCLI::print(EthereumCLI::parse(arguments)?),
        ("monero", Some(arguments)) => MoneroCLI::print(MoneroCLI::parse(arguments)?),
        ("zcash", Some(arguments)) => ZcashCLI::print(ZcashCLI::parse(arguments)?),
        _ => unreachable!(),
    }
}
我们再进入wagyu > cli > ethereum.rs目录下,发现里面有个简单的函数:
#![allow(unused)]
fn main() {
    pub fn new<R: Rng>(rng: &mut R) -> Result<Self, CLIError> {
        let private_key = EthereumPrivateKey::new(rng)?;
        let public_key = private_key.to_public_key();
        let address = public_key.to_address(&EthereumFormat::Standard)?;
        Ok(Self {
            private_key: Some(private_key.to_string()),
            public_key: Some(public_key.to_string()),
            address: Some(address.to_string()),
            ..Default::default()
        })
    }
}
很好,就拿这个改造了!
复制必要文件到新项目
- 新建项目
$ cargo new hello-crypto-rust
或者直接把上一个项目复制一份。
- 把
wagyu的Cargo.toml中的必要内容复制过来
#![allow(unused)]
fn main() {
[dependencies]
log = "0.4"
pretty_env_logger = "0.3"

wagyu-ethereum = { path = "./ethereum", version = "0.6.3" }
wagyu-model = { path = "./model", version = "0.6.3" }

arrayvec = { version = "0.5.1" }
base58 = { version = "0.1" }
clap = { version = "~2.33.1" }
colored = { version = "1.9" }
digest = { version = "0.9.0" }
either = { version = "1.5.3" }
failure = { version = "0.1.8" }
hex = { version = "0.4.2" }
lazy_static = { version = "1.4.0" }
rand = { version = "0.7" }
rand_core = { version = "0.5.1" }
safemem = { version = "0.3.3" }
serde = { version = "1.0", features = ["derive"] }
serde_json = { version = "1.0" }
tiny-keccak = { version = "1.4" }

[profile.release]
opt-level = 3
lto = "thin"
incremental = true

[profile.bench]
opt-level = 3
debug = false
rpath = false
lto = "thin"
incremental = true
debug-assertions = false

[profile.dev]
opt-level = 0

[profile.test]
opt-level = 3
incremental = true
debug-assertions = true
debug = true
}
- 把
ethereum与model两个文件夹复制到hello-crypto-rust目录下
此时的文件目录是这个样子的:
.
├── Cargo.lock
├── Cargo.toml
├── ethereum
├── model
├── src
└── target
补充代码
- 补充
lib.rs文件
在src目录下新建lib.rs文件,内容:
#![allow(unused)]
fn main() {
pub extern crate wagyu_ethereum as ethereum;
pub extern crate wagyu_model as model;
extern crate pretty_env_logger;
}
作用是加载外部 crate,更详细的说明可见:
https://wiki.jikexueyuan.com/project/rust-primer/module/module.html
- 编写
main.rs文件。
首先引用必要的外部模块:
#![allow(unused)]
fn main() {
use rand::{rngs::StdRng};
use rand_core::SeedableRng;
use hello_crypto_rust::ethereum::{EthereumPrivateKey, EthereumFormat};
use hello_crypto_rust::model::{PrivateKey, PrivateKeyError, AddressError, PublicKeyError, PublicKey};

#[macro_use] extern crate log;
}
然后我们编写主函数:
fn main(){
    pretty_env_logger::init();  // 初始化 pretty_env_logger 模块
    new(); //调用new函数
}
写new()函数:
#![allow(unused)]
fn main() {
pub fn new() -> Result<EthereumPrivateKey, CreateError> {
    let rng = &mut StdRng::from_entropy();
    let private_key = EthereumPrivateKey::new(rng)?;
    info!("priv: {}", private_key.to_string());
    let public_key = private_key.to_public_key();
    info!("pub: {}", public_key.to_string());
    let address = public_key.to_address(&EthereumFormat::Standard)?;
    info!("addr: {}", address.to_string());
    Ok(private_key)
}
}
我们这里使用了相对于println!更高级的输出方式,通过log输出。
这里有个关键的语法糖——?,用于错误处理。
把 result 用 match 连接起来会显得很难看;幸运的是,
?运算符可以把这种逻辑变得 干净漂亮。?运算符用在返回值为Result的表达式后面,它等同于这样一个匹配 表达式:其中Err(err)分支展开成提前返回的return Err(err),而Ok(ok)分支展开成ok表达式。—— https://rustwiki.org/zh-CN/rust-by-example/std/result/question_mark.html
两个等价的函数,一个使用了?,一个没有:
#![allow(unused)]
fn main() {
fn not_use_question_mark() {
    let a = 10;                                                   // 把这里改成 9 就会报错.
    let half = halves_if_even(a);
    let half = match half {
        Ok(item) => item,
        Err(e) => panic!(e),
    };
    assert_eq!(half, 5);
}


fn use_question_mark<'a >() -> Result<i32, &'a str> {              // 这里必须要返回Result
    let a = 10;
    let half = halves_if_even(a)?;                     // 因为?要求其所在的函数必须要返回Result
    assert_eq!(half, 5);
    Ok(half)
}
}
然后,我们定义一下枚举类型CreateError,里面会囊括AddressError、PrivateKeyError与PublicKeyError。
#![allow(unused)]
fn main() {
pub enum CreateError {
    AddressError(AddressError),
    PrivateKeyError(PrivateKeyError),
    PublicKeyError(PublicKeyError)
}

impl From<AddressError> for CreateError {
    fn from(error: AddressError) -> Self {
        CreateError::AddressError(error)
    }
}

impl From<PrivateKeyError> for CreateError {
    fn from(error: PrivateKeyError) -> Self {
        CreateError::PrivateKeyError(error)
    }
}

impl From<PublicKeyError> for CreateError {
    fn from(error: PublicKeyError) -> Self {
        CreateError::PublicKeyError(error)
    }
}
}
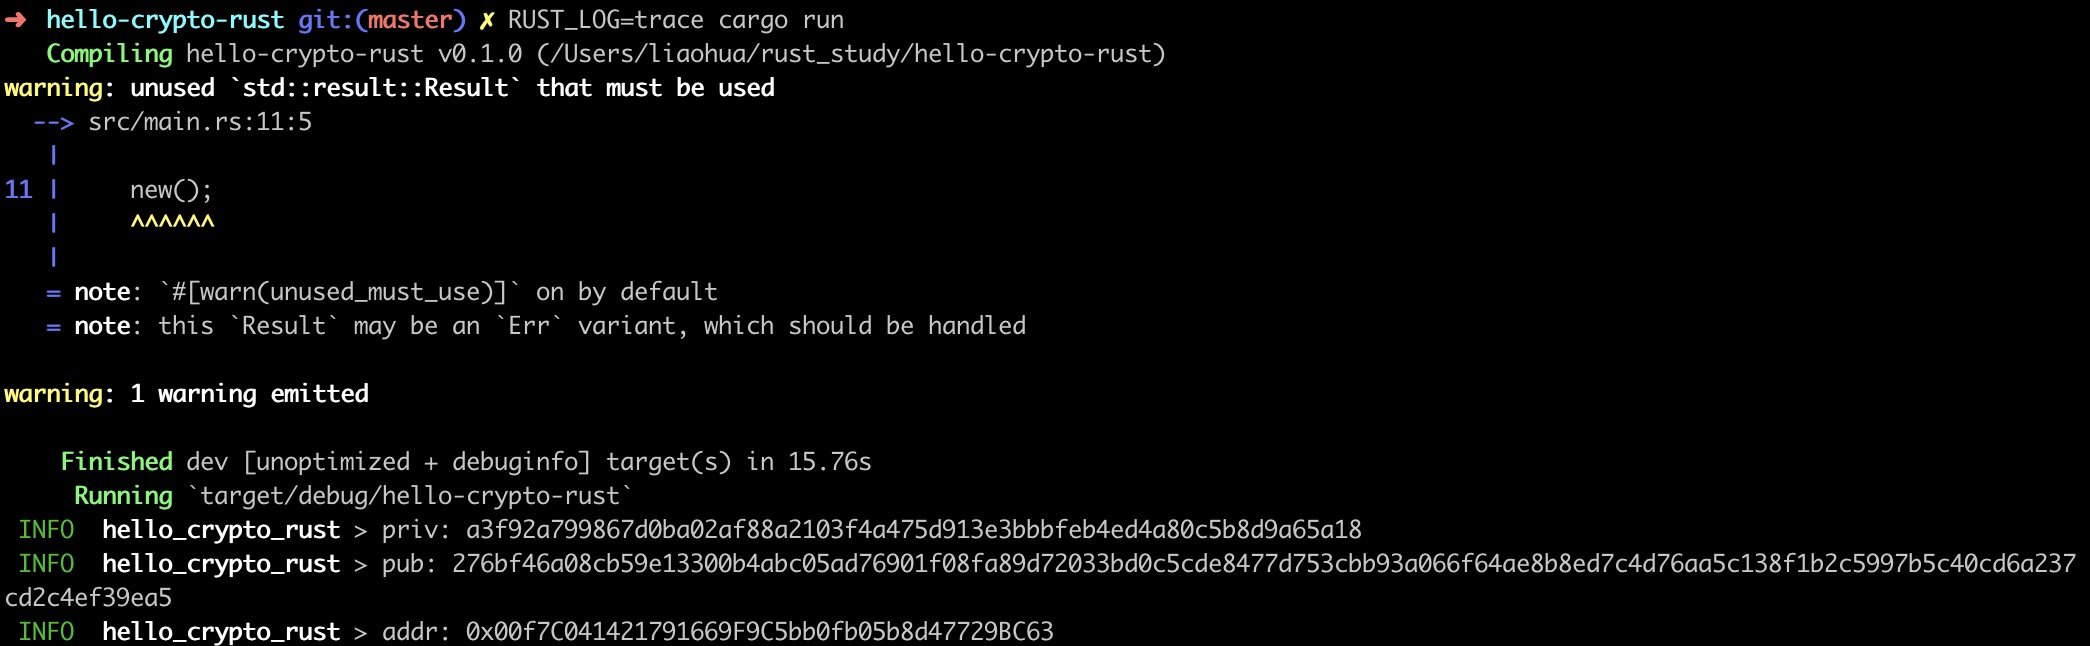
Try It!
实现成功:
本篇所涉及的知识点
- cargo 的更多用法
lib.rs的用法- 函数与函数返回值
pretty_env_logger的用法- 枚举类型,以
CreateError为例
作者简介:
李大狗(李骜华),上海对外经贸大学区块链技术与应用研究中心副主任、柏链教育 CTO、FISCO BCOS(微众银行区块链框架)区块链认证讲师、5 年区块链工程师、北京大学硕士。 研究领域包括:区块链系统、共识机制、智能合约、区块链应用、数字身份等。