华为 | 如何定制 Rust Clippy
作者:华为可信软件工程和开源2012实验室
Clippy 是什么
Clippy 是 Rust 官方提供的 代码检查 lint 工具,通过静态分析,来检查代码中有问题或不符合指定规范的代码。
项目地址:https://github.com/rust-lang/rust-clippy
安装
#![allow(unused)]
fn main() {
rustup component add clippy
}
使用
#![allow(unused)]
fn main() {
cargo clippy
}
配置
可以在项目中添加 clippy.toml 或 .clippy.toml 来指定使用的 Lints 。
类似于:
#![allow(unused)]
fn main() {
avoid-breaking-exported-api = false
blacklisted-names = ["toto", "tata", "titi"]
cognitive-complexity-threshold = 30
}
Cargo Clippy 中目前包含超过 450 个 Lint 。
Rust 编译器内置 Lint 介绍
在 Rust 编译器 中 lint 包含四种级别:
- allow ,编译器
- warn
- deny
- forbid
每个 lint 都有一个 默认级别。下面是一个分类:
- 默认允许的 Lints : 默认情况下,编译器允许的 Lints 。
- 默认警告Lints : 默认情况下,编译器会警告的 LInts 。
- 默认拒绝的 Lints : 默认情况下,编译器会拒绝的lints。
编译器内置 Lint 主要是围绕 Rust 语言特性。开发者可以通过配置文件来修改 Lints 等级。
Clippy 中的 Lints
Clippy 中的 Lints 级别包括:
- Allow
- Warn
- Deny
- Deprecated
Clippy 中的 lints 分类如下表:
| 分类 | 描述 | 默认级别 |
|---|---|---|
clippy::all | all lints that are on by default (correctness, style, complexity, perf) 所有默认的 Lints 都会被开启(正确性、风格、复杂性、性能) | warn/deny |
clippy::correctness | code that is outright wrong or very useless 代码是完全错误或根本无用的 | deny |
clippy::style | code that should be written in a more idiomatic way 代码应该用更惯用的方式来写 | warn |
clippy::complexity | code that does something simple but in a complex way 代码把简单的事情写复杂了 | warn |
clippy::perf | code that can be written to run faster 代码的写法在性能上还可以改进 | warn |
clippy::pedantic | lints which are rather strict or might have false positives 这些 lints 相当严格或可能有误报 | allow |
clippy::nursery | new lints that are still under development 仍然在开发中的新 lints | allow |
clippy::cargo | lints for the cargo manifest 用于cargo manifest 的 lints | allow |
总的来说,Clippy 对代码的检查主要是包括下面五个方面:
-
代码正确性(Correctness)。检查代码中不正确的写法。
-
代码风格(Style)。相比于 rustfmt,clippy 更偏向于代码实践中的惯用法检查。
-
代码复杂性(Complexity)。检查过于复杂的写法,用更简洁的写法代替。
-
代码不灵动 (Pedantic)。写法过于教条。
-
代码性能(Perf)。
代码正确性
Lint 示例: absurd_extreme_comparisons (荒谬的极值比较)
检查关系中的一方是其类型的最小值或最大值的比较,如果涉及到永远是真或永远是假的情况,则发出警告。只有整数和布尔类型被检查。
代码示例:
#![allow(unused)]
fn main() {
let vec: Vec<isize> = Vec::new();
if vec.len() <= 0 {}
if 100 > i32::MAX {} // 这里会报错:Deny ,因为 100 不可能大于 i32::MAX
}
代码风格
Lint 示例: assertions_on_constants (对常量的断言)
用于检查 assert!(true) 和 assert!(false) 的情况。
代码示例:
#![allow(unused)]
fn main() {
assert!(false)
assert!(true)
const B: bool = false;
assert!(B) // 会被编译器优化掉。
}
代码复杂性
Lint 示例: bind_instead_of_map
检查
_.and_then(|x| Some(y)),_.and_then(|x| Ok(y))or_.or_else(|x| Err(y))这样的用法,建议使用更简洁的写法_.map(|x| y)or_.map_err(|x| y)。
代码示例:
#![allow(unused)]
fn main() {
// bad
let _ = opt().and_then(|s| Some(s.len()));
let _ = res().and_then(|s| if s.len() == 42 { Ok(10) } else { Ok(20) });
let _ = res().or_else(|s| if s.len() == 42 { Err(10) } else { Err(20) });

// good
let _ = opt().map(|s| s.len());
let _ = res().map(|s| if s.len() == 42 { 10 } else { 20 });
let _ = res().map_err(|s| if s.len() == 42 { 10 } else { 20 });
}
代码不灵动
Lints 示例: cast_lossless
用于检查可以被安全转换(conversion)函数替代的数字类型之间的转换( cast )。
as强制转换与From转换从根本上不同。 From转换是“简单和安全”,而as强制转换纯粹是“安全”。在考虑数字类型时,仅在保证输出相同的情况下才存在From转换,即,不会丢失任何信息(不会出现截断或下限或精度下降)。 as强制转换没有此限制。
代码示例:
#![allow(unused)]
fn main() {
// bad
fn as_u64(x: u8) -> u64 {
    x as u64
}

// good
fn as_u64(x: u8) -> u64 {
    u64::from(x) // from内部其实也是as,但只要是实现 from 的,都是无损转换,在代码可读性、语义上更好
}
}
代码性能
Lints 示例: append_instead_of_extend
检查动态数组中是否出现
extend,建议使用append代替。
代码示例:
#![allow(unused)]
fn main() {
let mut a = vec![1, 2, 3];
let mut b = vec![4, 5, 6];

// Bad
a.extend(b.drain(..));

// Good
a.append(&mut b); // 用 append 代替 extend 更加高效和简洁。
}
还有一些其他分类,比如包括一些「约束性(Restriction)」建议、对 cargo.toml 的检查、以及正在开发中的Lints 等。
如何定制 Clippy Lint
定制 Clippy Lint 有两种办法:
- 方法一:fork rust-clippy 项目,自己维护。因为使用了不稳定的接口,所以维护和使用不太方便。
- 方法二:使用第三方 Dylint 工具。维护自定义 lint 比方法一更方便。
方法一:fork clippy
在 fork Clippy 定制自己的 LInt 之前,还需要了解 Clippy 的 工作机制。
Clippy 工作机制
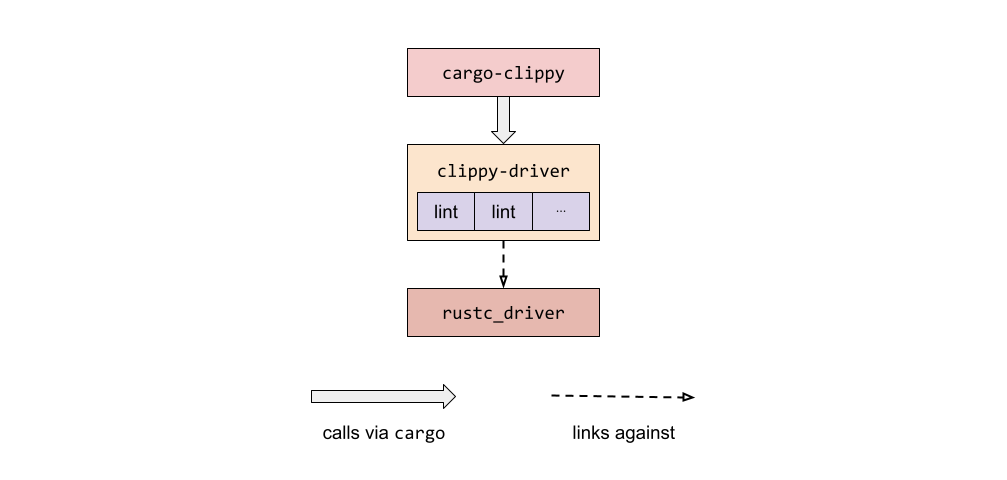
Clippy 通过 rust_driver 和 rustc_interface 这两个库,可以把 rustc 作为库来调用。
rustc_driver 本质上就像是整个rustc 编译器的main函数(入口)。它使用在rustc_interface crate中定义的接口以正确的顺序运行编译器。
rustc_interface crate为外部用户提供了一个(未稳定的)API,用于在编译过程中的特定时间运行代码,允许第三方(例如RLS或rustdoc)有效地使用rustc的内部结构作为分析crate 或 模拟编译器过程的库。
对于那些使用 rustc 作为库的人来说,rustc_interface::run_compiler() 函数是进入编译器的主要入口。它接收一个编译器的配置和一个接收编译器的闭包。run_compiler从配置中创建一个编译器并将其传递给闭包。在闭包中,你可以使用编译器来驱动查询,以编译一个 crate 并获得结果。这也是 rustc_driver 所做的。
rustc_interface 组件库中定义了Compiler 结构体,持有 register_lints 字段。该 Compiler结构体就是编译器会话实例,可以通过它传递编译器配置,并且运行编译器。
register_lints 是 持有 LintStore 可变借用的闭包,其类型签名是 Option<Box<dyn Fn(&Session, &mut LintStore) + Send + Sync>>。
LintStore 是 rustc_lint 组件库中定义的类型。
#![allow(unused)]
fn main() {
pub struct LintStore {
    /// Registered lints.
    lints: Vec<&'static Lint>,

    // 构造不同种类的 lint pass
    /// Constructor functions for each variety of lint pass.
    ///
    /// These should only be called once, but since we want to avoid locks or
    /// interior mutability, we don't enforce this (and lints should, in theory,
    /// be compatible with being constructed more than once, though not
    /// necessarily in a sane manner. This is safe though.)
    pub pre_expansion_passes: Vec<Box<dyn Fn() -> EarlyLintPassObject + sync::Send + sync::Sync>>,
    pub early_passes: Vec<Box<dyn Fn() -> EarlyLintPassObject + sync::Send + sync::Sync>>,
    pub late_passes: Vec<Box<dyn Fn() -> LateLintPassObject + sync::Send + sync::Sync>>,
    /// This is unique in that we construct them per-module, so not once.
    pub late_module_passes: Vec<Box<dyn Fn() -> LateLintPassObject + sync::Send + sync::Sync>>,

    /// Lints indexed by name.
    by_name: FxHashMap<String, TargetLint>,

  	// lint group,通过一个名字触发多个警告,把lint分组
    /// Map of registered lint groups to what lints they expand to.
    lint_groups: FxHashMap<&'static str, LintGroup>,
}
}
可以注册的 lint pass 还分好几类:
- early_passes:表示该类型的
lint pass对应的是EarlyContext,是在 AST 层级的 lint 检查,还未到 HIR 层面。 - late_passes:表示该类型的
lint pass对应的是LateContext,是在 类型检查之后的 lint 检查。意味着这样的检查需要获取类型信息。类型检查是在 HIR 层级做的。
在 rust_interface 中,还定义了相应的 check 方法:early_lint_methods! 定义的很多check方法 和 late_lint_methods。
声明一个 lint pass 需要使用 declare_late_lint_pass! 宏 中定义的 rustc_lint::LateLintPass trait。
再来看 run_compiler函数。
#![allow(unused)]
fn main() {
pub fn run_compiler<R: Send>(mut config: Config, f: impl FnOnce(&Compiler) -> R + Send) -> R {
    tracing::trace!("run_compiler");
    let stderr = config.stderr.take();
    util::setup_callbacks_and_run_in_thread_pool_with_globals(
        config.opts.edition,
        config.opts.debugging_opts.threads,
        &stderr,
        || create_compiler_and_run(config, f), // 设置一个回调函数
    )
}

// 回调函数
pub fn create_compiler_and_run<R>(config: Config, f: impl FnOnce(&Compiler) -> R) -> R {
    let registry = &config.registry;
    let (mut sess, codegen_backend) = util::create_session(
        config.opts,
        config.crate_cfg,
        config.diagnostic_output,
        config.file_loader,
        config.input_path.clone(),
        config.lint_caps,
        config.make_codegen_backend,
        registry.clone(),
    );
    // 。。。省略
  	let compiler = Compiler {
        sess,
        codegen_backend,
        input: config.input,
        input_path: config.input_path,
        output_dir: config.output_dir,
        output_file: config.output_file,
        register_lints: config.register_lints, // 配置 register_lints
        override_queries: config.override_queries,
    };

}
}
再看看 rustc_driver库,其中定义了 Callbacks trait :
#![allow(unused)]
fn main() {
pub trait Callbacks {
    /// Called before creating the compiler instance
    fn config(&mut self, _config: &mut interface::Config) {}
    /// Called after parsing. Return value instructs the compiler whether to
    /// continue the compilation afterwards (defaults to `Compilation::Continue`)
    fn after_parsing<'tcx>(
        &mut self,
        _compiler: &interface::Compiler,
        _queries: &'tcx Queries<'tcx>,
    ) -> Compilation {
        Compilation::Continue
    }
    /// Called after expansion. Return value instructs the compiler whether to
    /// continue the compilation afterwards (defaults to `Compilation::Continue`)
    fn after_expansion<'tcx>(
        &mut self,
        _compiler: &interface::Compiler,
        _queries: &'tcx Queries<'tcx>,
    ) -> Compilation {
        Compilation::Continue
    }
    /// Called after analysis. Return value instructs the compiler whether to
    /// continue the compilation afterwards (defaults to `Compilation::Continue`)
    fn after_analysis<'tcx>(
        &mut self,
        _compiler: &interface::Compiler,
        _queries: &'tcx Queries<'tcx>,
    ) -> Compilation {
        Compilation::Continue
    }
}
}
该trait中定义了在编译不同阶段要执行的回调函数。
所以,在 Clippy 的 driver.rs 中就做了如下定义:
#![allow(unused)]
fn main() {
struct ClippyCallbacks {
    clippy_args_var: Option<String>,
}

// 为 ClippyCallbacks 实现 rustc_driver::Callbacks ,定义 config 方法
// 该 config 方法创建编译器实例之前被执行的
impl rustc_driver::Callbacks for ClippyCallbacks {
    fn config(&mut self, config: &mut interface::Config) {
        let previous = config.register_lints.take();
        let clippy_args_var = self.clippy_args_var.take();
        config.parse_sess_created = Some(Box::new(move |parse_sess| {
            track_clippy_args(parse_sess, &clippy_args_var);
        }));
        // 注册 lints
        config.register_lints = Some(Box::new(move |sess, lint_store| {
            // technically we're ~guaranteed that this is none but might as well call anything that
            // is there already. Certainly it can't hurt.
            if let Some(previous) = &previous {
                (previous)(sess, lint_store);
            }

            let conf = clippy_lints::read_conf(sess);
            clippy_lints::register_plugins(lint_store, sess, &conf);
            clippy_lints::register_pre_expansion_lints(lint_store);
            clippy_lints::register_renamed(lint_store);
        }));

        // FIXME: #4825; This is required, because Clippy lints that are based on MIR have to be
        // run on the unoptimized MIR. On the other hand this results in some false negatives. If
        // MIR passes can be enabled / disabled separately, we should figure out, what passes to
        // use for Clippy.
        config.opts.debugging_opts.mir_opt_level = Some(0);
    }
}
}
所以,Clippy 通过 ClippyCallbacks 的 config 来注册 lints 。在 config 函数内部,通过调用 clippy_lints::read_conf(sess) 来读取 clippy 配置文件里的lint。在 clippy_lints 里还定义了 register_plugins,使用 rustc_lint::LintStore 来注册 clippy 里定义的 lints。
以上就是 Clippy 的工作机制。
自定义 Clippy lints
通过了解 Clippy 工作机制,可以看得出来,如果要自定义 Clippy lints,是需要严重依赖 rustc 版本的,因为 rustc_interface 提供的接口并不稳定。所以维护成本比较高。
如果一定要通过这种方式自定义 Clippy lints ,需要按以下步骤开发。
安装配置 Clippy
- 下载 Clippy 源码。
- 执行
cargo build和cargo test。因为Clippy 测试套件非常大,所以可以只测试部分套件,比如,cargo uitest,或cargo test --test dogfood。如果 UITest 和预期不符,可以使用cargo dev bless更新相关文件。 - Clippy 提供了一些开发工具,可以通过
cargo dev --help查看。
UI测试的目的是捕捉编译器的完整输出,这样我们就可以测试演示的所有方面。
测试正常的话,修改Clippy 生成二进制的名字,防止影响我们开发环境中安装的 Clippy命令。
- 在
Cargo.toml中修改
#![allow(unused)]
fn main() {
[[bin]]
name = "cargo-myclippy" // 此处原本是 "cargo-clippy"
test = false
path = "src/main.rs"

[[bin]]
name = "clippy-mydriver" //  此处原本是 "clippy-mydriver"
path = "src/driver.rs"
}
- 修改
src/main.rs
#![allow(unused)]
fn main() {
.with_file_name("clippy-mydriver"); // 将使用 `clippy-driver` 的地方修改为 `clippy-mydriver`
}
起一个有意义的名字
定义 lints 需要先起一个符合 Lints 命名规范 的名字。
Lints 命名规范的首要原则就是:lint 名字要有意义。比如 allow dead_code,这是有意义的,但是allow unsafe_code这个就有点过分了。
具体来说,有几条注意事项:
- Lint 名称应该标明被检查的「坏东西」。比如
deprecated,所以,#[allow(deprecated)](items)是合法的。但是ctypes就不如improper_ctypes更明确。 - 命名要简洁。比如
deprecated,就比deprecated_item更简洁。 - 如果一个 lint 应用于特定的语法,那么请使用复数形式。比如使用
unused_variables而不是unused_variable。 - 捕捉代码中不必要的、未使用的或无用的方面的行文应该使用术语
unused,例如unused_imports、unused_typecasts。 - lint 命名请使用蛇形(snake case)命名,与函数名的方式相同。
设置样板代码
假如新的 lint 叫 foo_functions,因为该lint不需要用到类型信息(比如某结构体是否实现 Drop),所以需要定义 EarlyLintPass。
在 Clippy 项目根目录下,通过以下命令创建 Lint:
#![allow(unused)]
fn main() {
cargo dev new_lint --name=foo_functions --pass=early --category=pedantic
}
如果没有提供 category ,则默认是 nursery 。
执行完该命令以后,在 Clippy-lint/src/ 目录下就会多一个 foo_functions.rs 的文件,文件中包含了样板代码:
#![allow(unused)]
fn main() {
use rustc_lint::{EarlyLintPass, EarlyContext};
use rustc_session::{declare_lint_pass, declare_tool_lint};
use rustc_ast::ast::*;

// 此宏用于定义 lint
declare_clippy_lint! {
    /// **What it does:**
    ///
    /// **Why is this bad?**
    ///
    /// **Known problems:** None.
    ///
    /// **Example:**
    ///
    /// ```rust
    /// // example code where clippy issues a warning
    /// ```
    /// Use instead:
    /// ```rust
    /// // example code which does not raise clippy warning
    /// ```
    pub FOO_FUNCTIONS, // lint 名字大写
    pedantic, // lint 分类
    "default lint description" // lint 描述
}

// 定义 lint pass。 注意,lint 和 lint pass 并不一定成对出现
declare_lint_pass!(FooFunctions => [FOO_FUNCTIONS]);

// 因为不需要使用类型信息,此处实现 EarlyLintPass
impl EarlyLintPass for FooFunctions {}


}
除了此文件,还会创建 test/ui/foo_functions.rs 测试文件。
接下来,需要执行 cargo dev update_lints 命令来注册新 lint。
添加 Lint pass 内容
先来写一些测试代码。
Clippy使用UI测试进行测试。UI测试检查Clippy的输出是否与预期完全一致。每个测试都是一个普通的Rust文件,包含我们要检查的代码。Clippy的输出与一个.stderr文件进行比较。注意,你不需要自己创建这个文件,我们将进一步讨论生成.stderr文件。
我们首先打开在test/ui/foo_functions.rs创建的测试文件。
用一些例子来更新该文件,以便开始使用。
#![warn(clippy::foo_functions)]

// Impl methods
struct A;
impl A {
    pub fn fo(&self) {}
    pub fn foo(&self) {}
    pub fn food(&self) {}
}

// Default trait methods
trait B {
    fn fo(&self) {}
    fn foo(&self) {}
    fn food(&self) {}
}

// Plain functions
fn fo() {}
fn foo() {}
fn food() {}

fn main() {
    // We also don't want to lint method calls
    foo();
    let a = A;
    a.foo();
}
可以使用 TESTNAME=foo_functions cargo uitest来执行测试。
可以看到输出:
#![allow(unused)]
fn main() {
test [ui] ui/foo_functions.rs ... ok
}
接下来,打开 src/foo_functions.rs 编写 Lint 代码。
#![allow(unused)]
fn main() {
declare_clippy_lint! {
    /// **What it does:**
    ///
    /// **Why is this bad?**
    ///
    /// **Known problems:** None.
    ///
    /// **Example:**
    ///
    /// ```rust
    /// // example code
    /// ```
    pub FOO_FUNCTIONS,
    pedantic, // 该类型的lint 等级 默认是 Allow
    "function named `foo`, which is not a descriptive name" // 修改 lint 声明的描述内容
}
}
可以通过执行 cargo dev serve在本地打开网页服务,可以查到 foo_functions显示的描述。
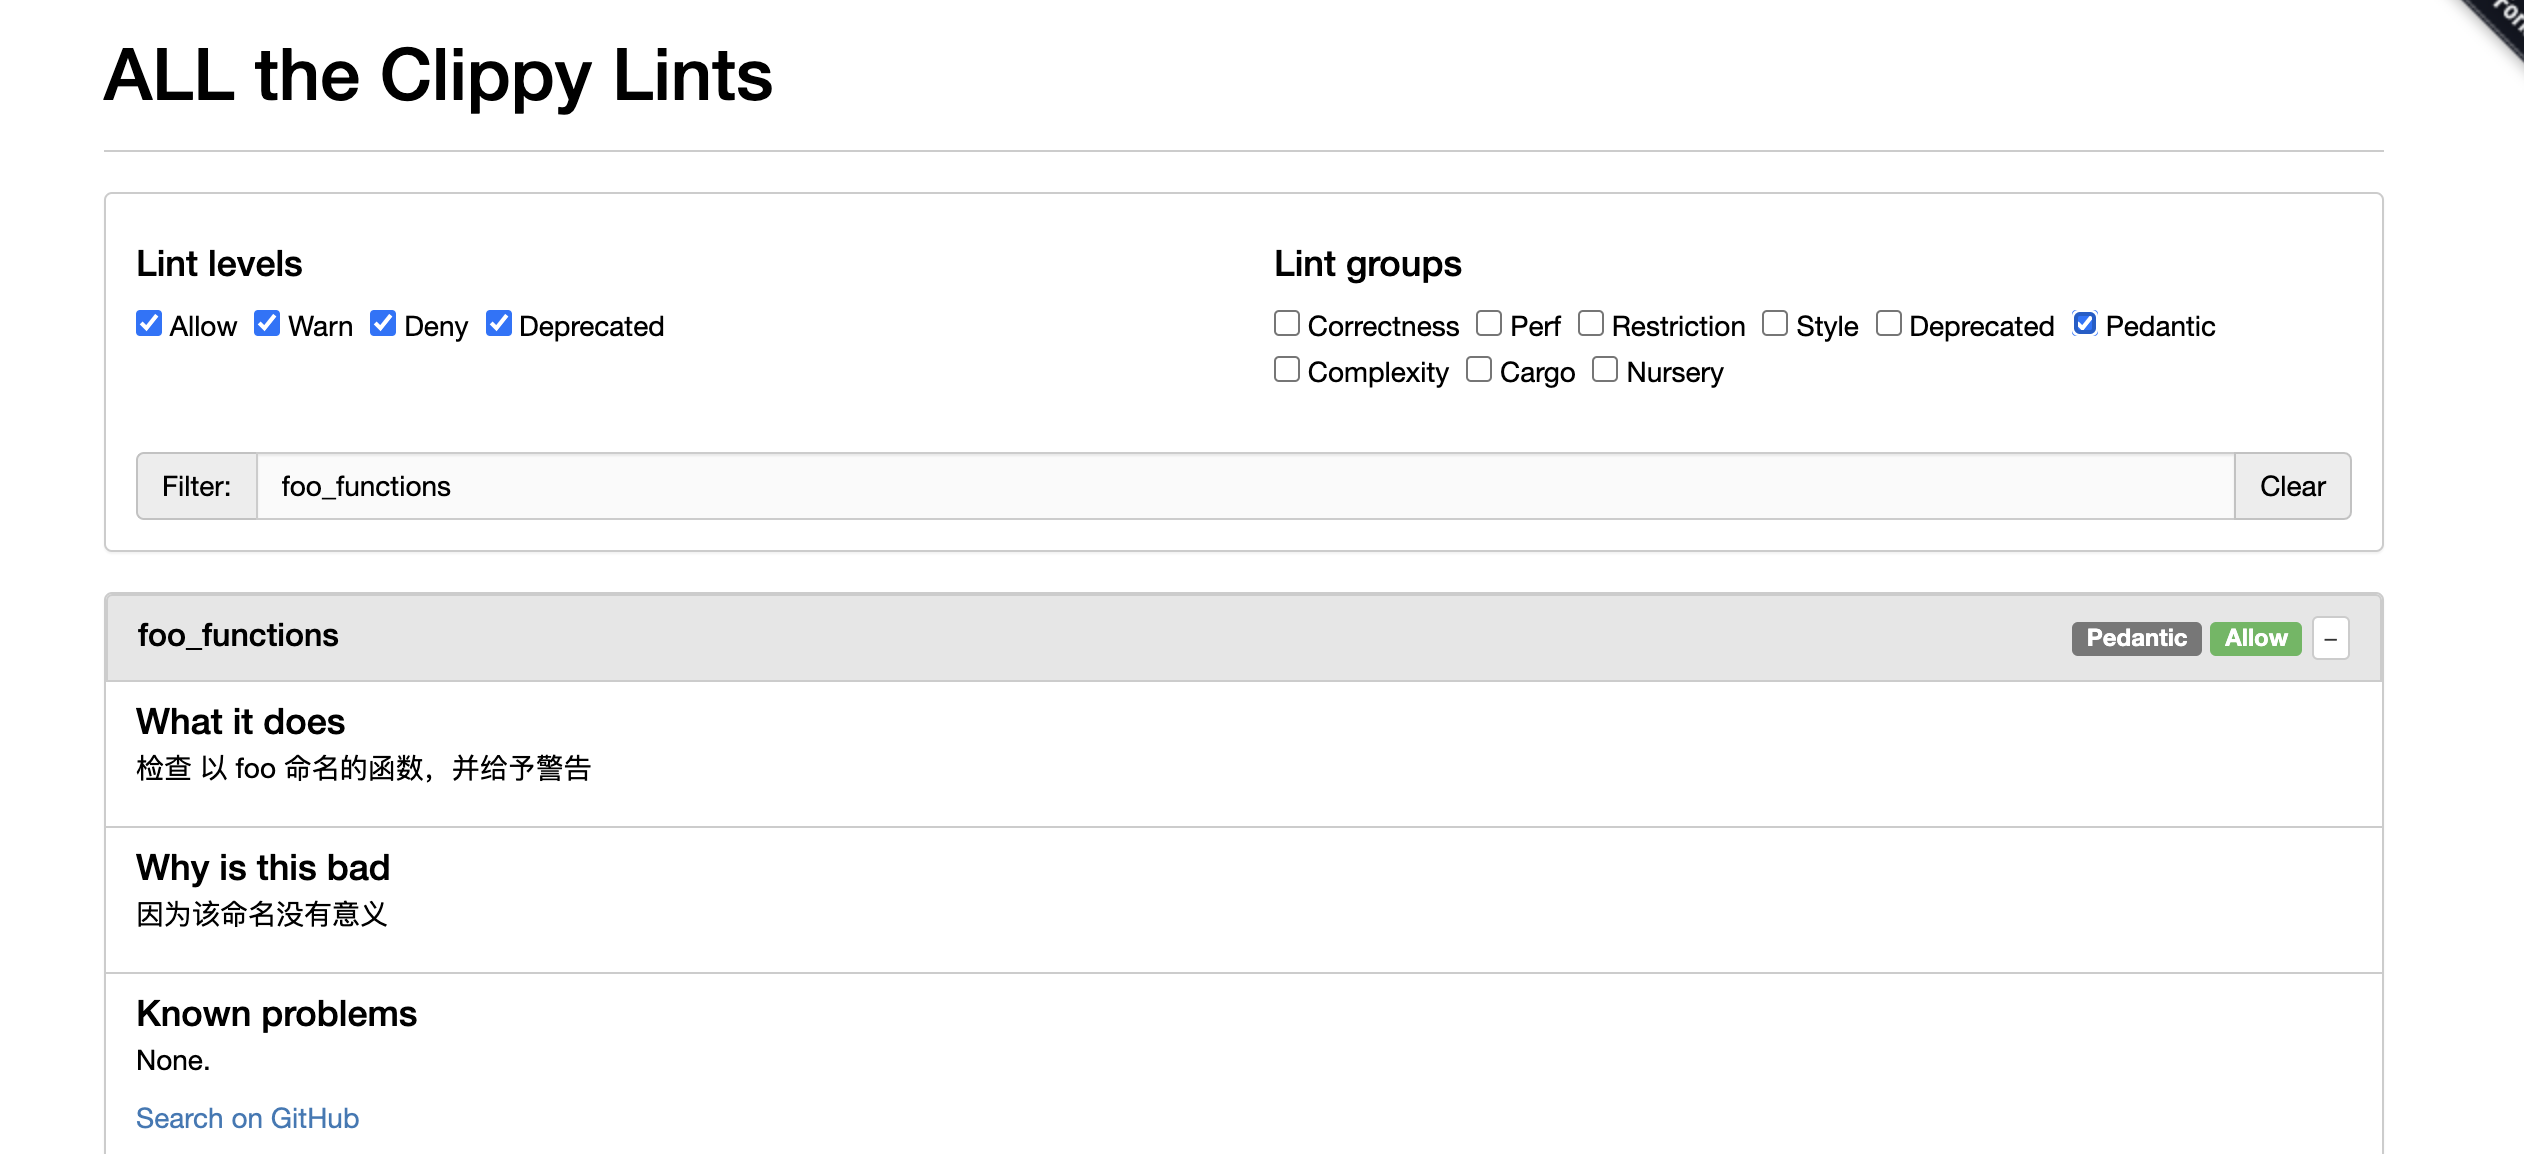
`Pedantic的默认lint 等级是allow\,定义于 https://github.com/rust-lang/rust-clippy/blob/master/clippy_lints/src/lib.rs#L119
通常在声明了lint之后,我们必须运行cargo dev update_lints 来更新一些文件,以便 Clippy 知道新的 Lint。由于上面是用cargo dev new_lint ... 命令来生成lint声明,所以这是自动完成的。
虽然 update_lints自动完成了大部分工作,但它并没有自动完成所有工作。我们必须在clippy_lints/src/lib.rs的register_plugins函数中手动注册我们的lint pass。
#![allow(unused)]

fn main() {
pub fn register_plugins(store: &mut rustc_lint::LintStore, sess: &Session, conf: &Conf) {
    // 此处省略 2000 行代码
		// foo_functions
    store.register_early_pass(|| box foo_functions::FooFunctions);

}
}
该函数有 2000 多行代码,维护起来可想而知多么麻烦了。
因为此 lint pass 只是检查函数名字,不涉及类型检查,所以只需要 AST 层面的处理即可。关于 EarlyLintPass 和 LateLintPass 的区别前文已经介绍过。EarlyLintPass 比 LateLintPass 更快一些,然而 Clippy 的性能并不是关注的重点。
由于我们在检查函数名时不需要类型信息,所以在运行新的lint自动化时,我们使用了--pass=early,所有的样板导入都相应地被添加了。
下一步就可以实现 Lint 的检查逻辑了。
#![allow(unused)]
fn main() {
// src/foo_functions.rs
impl EarlyLintPass for FooFunctions {
  	// 此处 check_fn 是内置 EarlyLintPass trait 包含方法,前文介绍过
    fn check_fn(&mut self, cx: &EarlyContext<'_>, fn_kind: FnKind<'_>, span: Span, _: NodeId) {
        // TODO: Emit lint here 此处编写检查逻辑
    }
}
}
对于如何检查函数名字,在 clippy_utils/src/diagnostics.rs中定义了一些帮助函数。经过查找,span_lint_and_help函数在此处使用比较适合。
#![allow(unused)]
fn main() {
// src/foo_functions.rs
use clippy_utils::diagnostics::span_lint_and_help;
use rustc_span::Span;
use rustc_ast::{ast::NodeId, visit::FnKind};

impl EarlyLintPass for FooFunctions {
    fn check_fn(&mut self, cx: &EarlyContext<'_>, fn_kind: FnKind<'_>, span: Span, _: NodeId) {
        span_lint_and_help(
            cx,
            FOO_FUNCTIONS,
            span,
            "function named `foo`",
            None,
            "consider using a more meaningful name"
        );
    }
}
}
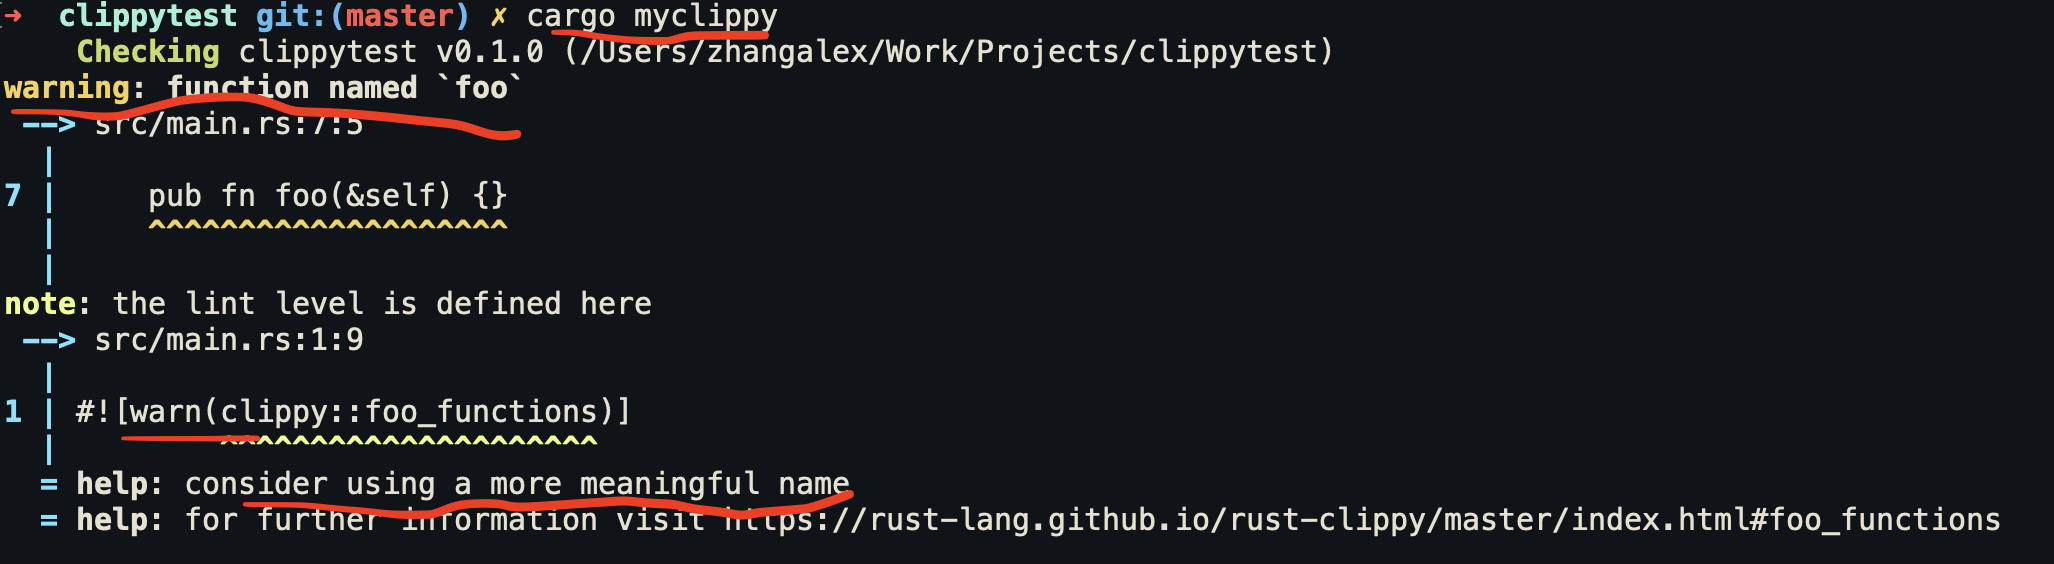
执行测试代码,输出如下:

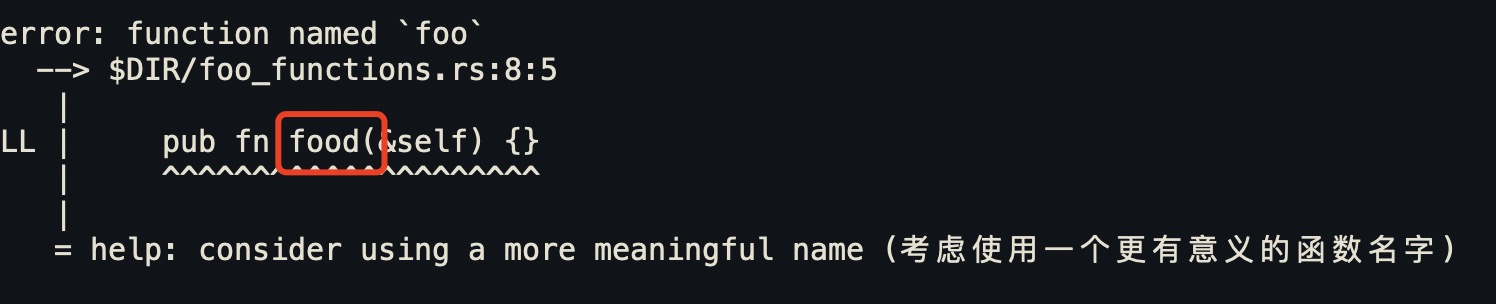
诊断信息是有效果了,但是缺乏一些lint检测逻辑。所以进一步修改:
#![allow(unused)]
fn main() {
impl EarlyLintPass for FooFunctions {
    fn check_fn(&mut self, cx: &EarlyContext<'_>, fn_kind: FnKind<'_>, span: Span, _: NodeId) {
        // 增加判断逻辑
        fn is_foo_fn(fn_kind: FnKind<'_>) -> bool {
            match fn_kind {
                FnKind::Fn(_, ident, ..) => {
                    // check if `fn` name is `foo`
                    ident.name.as_str() == "foo"
                }
                // ignore closures
                FnKind::Closure(..) => false
            }
        }
        // 增加判断逻辑
        if is_foo_fn(fn_kind) {
            span_lint_and_help(
                cx,
                FOO_FUNCTIONS,
                span,
                "function named `foo`",
                None,
                "consider using a more meaningful name (考虑使用一个更有意义的函数名字)"
            );
        }
    }
}
}
再次执行测试输出:
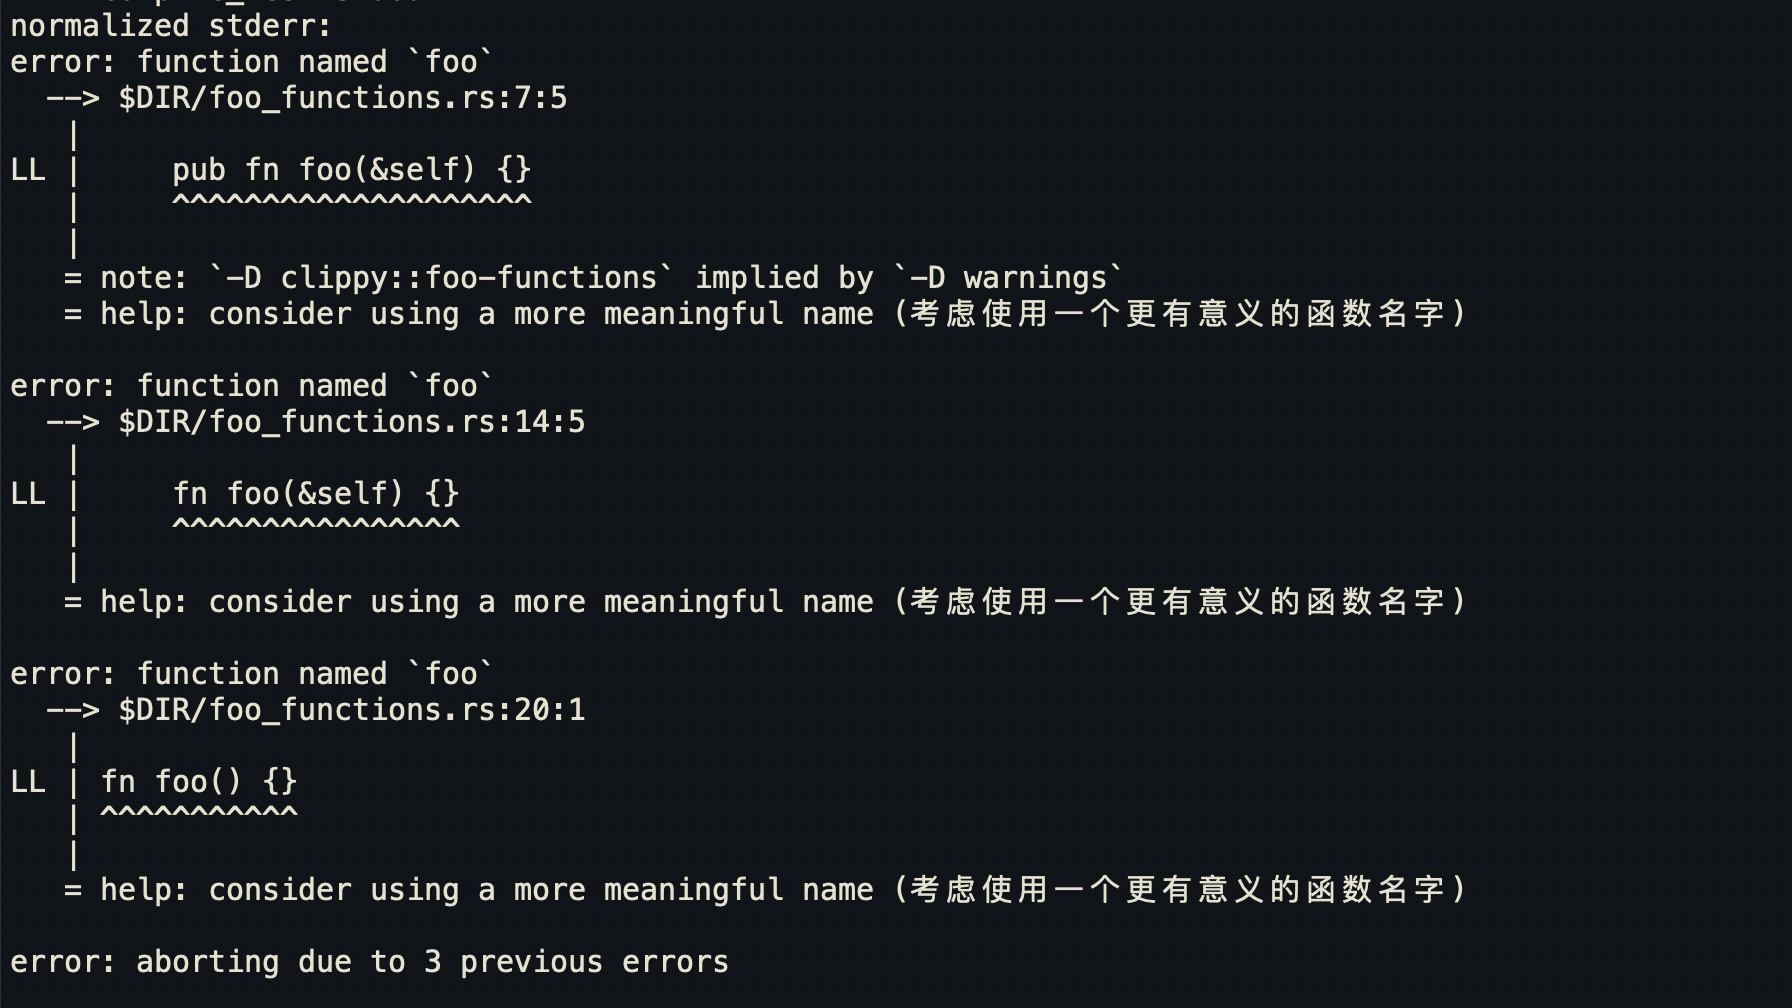
接下来执行:
cargo dev bless更新.stderr文件。这个.stderr文件是需要提交的。如果测试出现错误,记得执行这一步。cargo test。
执行 cargo test 失败,因为 clippy 不允许出现 中文描述。所以,修改:
#![allow(unused)]
fn main() {
if is_foo_fn(fn_kind) {
    span_lint_and_help(
      cx,
      FOO_FUNCTIONS,
      span,
      "function named `foo`",
      None,
      "consider using a more meaningful name (考虑使用一个更有意义的函数名字)" // 此处不允许中文,当然你也可以修改 clippy 自身的 lint 配置
    );
}

// 修改为

if is_foo_fn(fn_kind) {
    span_lint_and_help(
      cx,
      FOO_FUNCTIONS,
      span,
      "function named `foo`",
      None,
      "consider using a more meaningful name"
    );
}

}
测试成功。
最后执行 cargo dev fmt,格式化代码。
到目前为止,自定义 clippy lint 已经完成。
测试 Clippy lint 效果
因为我们自定义的 Clippy 二进制名字已经被修改了,所以可以直接安装,不怕和已安装的clippy有冲突了。
执行以下命令安装自定义的Clippy:
#![allow(unused)]
fn main() {
cargo install --bin=cargo-myclippy --bin=clippy-mydriver --path=.
}
然后重新使用 cargo new clippytest创建一个新项目。
将 src/main.rs修改为:
#![warn(clippy::foo_functions)]

// Impl methods
struct A;
impl A {
    pub fn fo(&self) {}
    pub fn foo(&self) {}
    pub fn food(&self) {}
}

// Default trait methods
trait B {
    fn fo(&self) {}
    fn foo(&self) {}
    fn food(&self) {}
}

// Plain functions
fn fo() {}
fn foo() {}
fn food() {}

fn main() {
    // We also don't want to lint method calls
    foo();
    let a = A;
    a.foo();
}
【如有必要】然后在 clippytest项目目录下创建 rust-toolchain 文件:
#![allow(unused)]
fn main() {
[toolchain]
channel = "nightly-2021-06-17"
components = ["llvm-tools-preview", "rustc-dev", "rust-src"]
}
这个文件里的配置,要和 官方 rust-clippy 下一致,也就是你fork的那个原项目。
然后命令行执行:cargo myclippy,输出:
成功!
然后回去 src/main.rs中,将 #![warn(clippy::foo_functions)] 改为 #![error(clippy::foo_functions)],再次执行 cargo myclippy,输出:
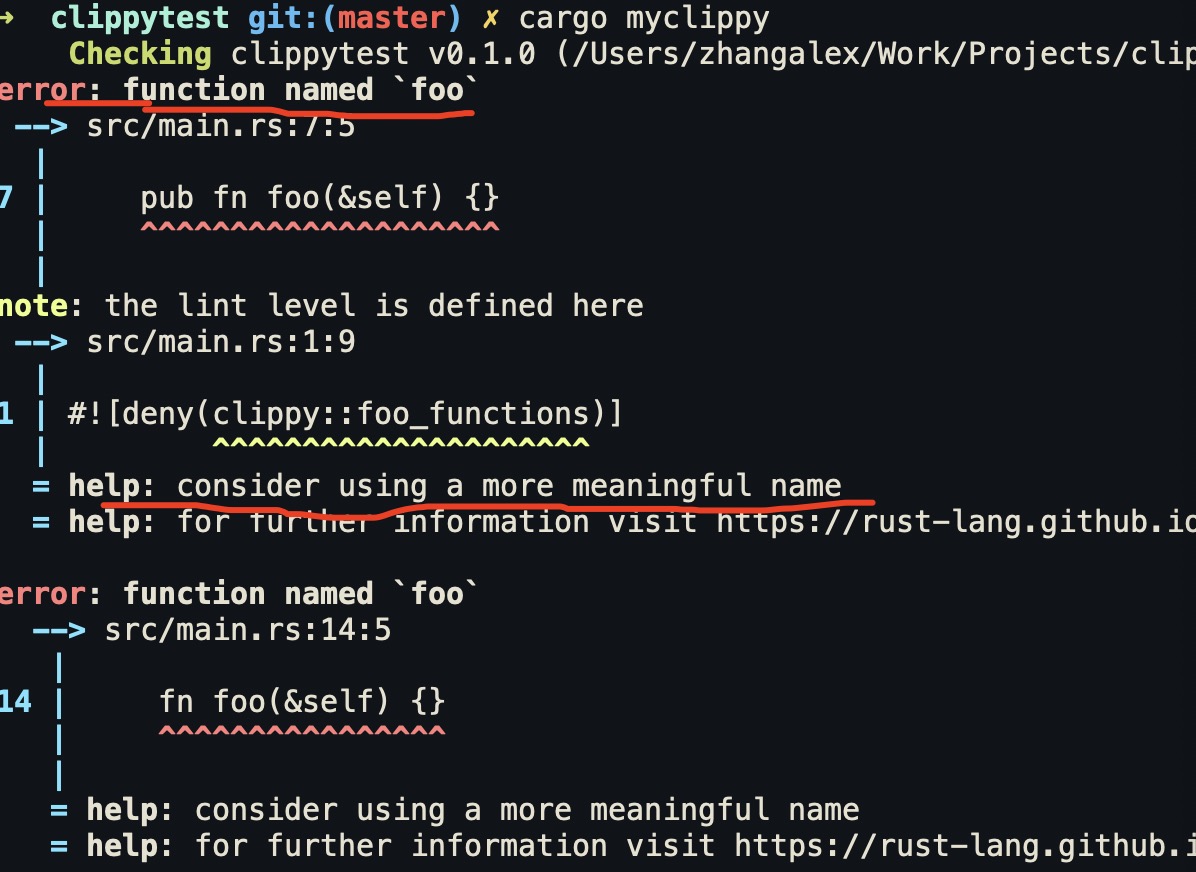
成功!
到此为止,自定义 Clippy Lint 成功!
小结
通过 fork clippy,完全可以定制自己的 Lint 。但是也有很明显的缺陷:
- Clippy 内置 lint 很多,需要手工注册自定义lint,想想那个 2000 行的函数就头疼。
- Clippy 依赖 rustc_interface 是未稳定的 API 。clippy_utils 里提供的helper方法也是依赖于编译器这个未稳定接口,这样不同编译器版本就会难以兼容。导致不能通用。
- 需要命名为自己的 Clippy 二进制文件,避免和原本的 Clippy 冲突。
如果自定义 Lint 可以 PR 更好,但并不是所有自定义 Lint 都可以提交到官方 PR ,必然需要维护自己的/团队的特殊场景的 Lint。就会面对上面的缺陷。
有没有更好的办法呢?
方法二:使用 Dylint
参考:Write Rust lints without forking Clippy
社区有人开发了一个工具: Dylint 。它的特点:
- 以动态库的方式来提供 lint 。而 Clippy 是静态库。Clippy 的所有 lint 都使用相同的编译器版本,因此只需要
rustc_driver。 - Dylint 用户可以选择从不同编译器版本的库中加载 lint。
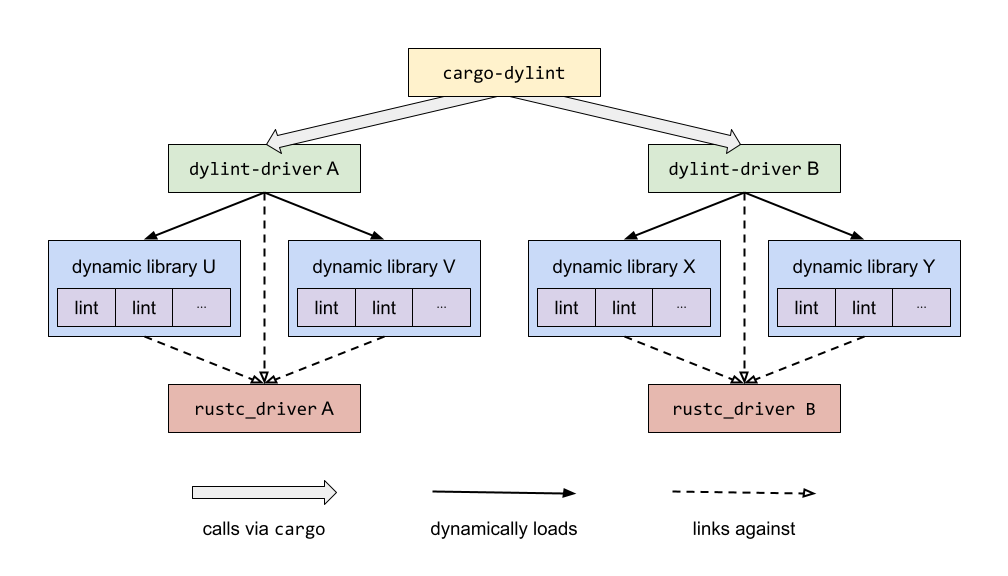
Dylint 可以动态构建 rustc_driver。换句话说,如果用户想要 A 版本的编译器库中加载 lint,并且找不到 A 版本的 rustc_driver,Dylint 将构建一个新的 A 版本的rustc_driver。rustc_driver缓存在用户的主目录中,因此仅在必要时重建它们。
Dylint 根据它们使用的编译器版本对库进行分组,使用相同编译器版本的库一起加载,并和它们的 lint 一起运行。这允许在 lint 之间共享中间编译结果(如:符号解析,类型检查,trait求解等)。
在上图中,如果库 U 和 V 都使用了 A 版本的编译器,这两个库将被放到同一个分组中。A 版本编译器的rustc_driver将只被调用一次。rustc_driver在将控制权移交给 Rust 编译器之前会在库 U 和库 V 中注册 lint。
安装和配置
通过下面命令安全 dylint:
#![allow(unused)]
fn main() {
cargo install cargo-dylint
cargo install dylint-link
}
然后获取模版项目:
#![allow(unused)]
fn main() {
git clone https://github.com/trailofbits/dylint-template
}
或者使用 cargo-generate来创建模版
#![allow(unused)]
fn main() {
cargo generate --git https://github.com/trailofbits/dylint-template
}
将项目命名为 :mylints
然后进入到项目根目录,执行:
#![allow(unused)]
fn main() {
cargo build
cargo dylint fill_me_in --list
}
编写 lint
因为生成的模版其实和 上面 fork clippy 自定义生成的代码模版类似,所以直接将上面的 lint 代码复制过来。
创建新文件 src/foo_functions.rs。
#![allow(unused)]
fn main() {
use clippy_utils::diagnostics::span_lint_and_help;
use rustc_ast::{ast::NodeId, visit::FnKind};
use rustc_lint::{EarlyContext, EarlyLintPass};
use rustc_span::Span;
use rustc_lint::LateLintPass;
use rustc_session::{declare_lint, declare_lint_pass};

declare_lint! {
    /// **What it does:**
    ///  检查 以 foo 命名的函数,并给予警告
    /// **Why is this bad?**
    ///    因为该命名没有意义
    /// **Known problems:** None.
    ///
    /// **Example:**
    ///
    /// ```rust
    /// // example code where clippy issues a warning
    /// ```
    /// Use instead:
    ///   考虑使用一个更有意义的函数名字
    /// ```rust
    /// // example code which does not raise clippy warning
    /// ```
    pub FOO_FUNCTIONS,
    Warn, //  注意:这里和  fork Clippy 略有不同
    "function named `foo`, which is not a descriptive name"
}

declare_lint_pass!(FooFunctions => [FOO_FUNCTIONS]);


impl EarlyLintPass for FooFunctions {
    fn check_fn(&mut self, cx: &EarlyContext<'_>, fn_kind: FnKind<'_>, span: Span, _: NodeId) {
        fn is_foo_fn(fn_kind: FnKind<'_>) -> bool {
            match fn_kind {
                FnKind::Fn(_, ident, ..) => {
                    // check if `fn` name is `foo`
                    ident.name.as_str() == "foo"
                },
                // ignore closures
                FnKind::Closure(..) => false,
            }
        }

        if is_foo_fn(fn_kind) {
            span_lint_and_help(
                cx,
                FOO_FUNCTIONS,
                span,
                "function named `foo`",
                None,
                "consider using a more meaningful name",
            );
        }
    }
}
}
代码复制完毕之后,在 src/lib.rs 中添加:
#![allow(unused)]
fn main() {
mod foo_functions;

#[no_mangle]
pub fn register_lints(_sess: &rustc_session::Session, lint_store: &mut rustc_lint::LintStore) {
    lint_store.register_lints(&[foo_functions::FOO_FUNCTIONS]);
    lint_store.register_early_pass(|| Box::new(foo_functions::FooFunctions));
}
}
注意:需要配置当前项目下 .cargo/config.toml 中针对当前架构平台的 target 指定的链接器,否则会报 找不到库 之类的错误。
#![allow(unused)]
fn main() {
[target.aarch64-apple-darwin]
linker = "dylint-link"

[target.x86_64-apple-darwin]
linker = "dylint-link"

[target.x86_64-unknown-linux-gnu]
linker = "dylint-link"
}
然后执行 cargo build 编译成功。
接下来需要设置几个环境变量:
#![allow(unused)]
fn main() {
export MY_LINTS_PATH=/Work/Projects/myworkspace/mylints
export DYLINT_LIBRARY_PATH=$MY_LINTS_PATH/target/debug
}
然后执行 cargo test。可以看到 uitest 的输出。
但是 dylint 有个缺点,就是 uitest 无法像 clippy那样(cargo dev bless) 更新引用。所以 cargo test 会测试失败。
但是可以在 src/lib.rs 中,添加:
#![allow(unused)]
fn main() {
#[allow(dead_code)]
fn foo() {}
}
然后在 mylints项目下执行: cargo dylint --all 。就能看到 lint 生效了。
以上是我们编写了独立的 lints。
测试独立项目
随便创建一个 新的项目 myproject,将 src/main.rs 换成和前面测试 clippy 时候用的代码。
基于前面设置好的 mylints ,我们只需要直接使用 cargo dylint --all 命令即可。
然后在该项目根目录下执行:
#![allow(unused)]
fn main() {
cargo dylint --all -- --manifest-path=/Work/Projects/myproject/Cargo.toml
}
然后就可以正常执行 lint 检测了。
小结
使用 dylint 比较麻烦的是,文档不是很全,测试不支持更新引用,不如 fork clippy 方便测试。
但是 dylint 确实比较小巧,只需要维护我们自定义的lint 即可,不再需要维护 2000 多行的注册lint代码。
使用 dylint 的时候,因为也依赖了 clippy 的 clippy_utils,所以需要和 clippy 的 rustc 版本保持一致。
总结
上面总结了两种定制 Clippy Lints 的方法,各有优劣。
一个观点:
-
第一种方法比较适合 大公司/大团队,因为第一种方法比较完善,功能齐备,只是需要一个专门的团队来维护这个 lints。并且还有可能给上游去发 PR (如果需要),形成正向反馈,让工具更加完善。另外,也许可以给 Clippy 提供一个 Plugin 机制,方便维护定制的 Lint。
-
第二种方法适合小团队,没有多余的人力去维护,只需要定制自己的一些 lints 使用即可。
欢迎在评论区留言交流。
有用的参考资源:
以下资源对你编写 lint 将很有帮助:
- 添加一个新的 lint (针对 Clippy 但依然很有用)
- 编写 lint 的常用工具
- rustc_hir 文档