字节 | 如何用Rust做Android UI渲染
作者:大力智能技术团队-客户端-西豢沝尔
来源:https://juejin.cn/post/7002778072348885000/
背景
Rust优秀的安全性、媲美C++的性能以及对跨平台编译和外部语言(ffi)的支持使得其成为高性能跨平台库的上佳实现语言。然而,Rust是否可以在逻辑层之上进一步服务于一些通用性的UI渲染?我们大力智能客户端团队针对开源项目rust-windowing中几个核心工程进行剖析,并结合在Android系统的接入对此进行探索。
Rust UI渲染:
Android 系统上使用 Rust 渲染核心围绕ANativeWindow类展开,ANativeWindow位于android ndk中,是egl跨平台EGLNativeWindowType窗口类型在 Android 架构下的特定实现,因而基于ANativeWindow 就可以创建一个EglSurface 并通过 GLES 进行绘制和渲染。另一方面,ANativeWindow可以简单地与 Java 层的Surface相对应,因而将 Android 层需要绘制的目标转换为ANativeWindow是使用 Rust 渲染的关键,这一部分可以通过JNI完成。首先,我们先看一下rust-windowing 对UI渲染的支持。
1 软件绘制:
在rust-windowing项目中,android-ndk-rs提供了rust与android ndk之间的胶水层,其中与UI渲染最相关的就是NativeWindow类,NativeWindow在Rust上下文实现了对ANativeWindow的封装,支持通过ffi对ANativeWindow进行操作,达到与在 java 层使用lockCanvas()和unlockCanvasAndPost()进行绘制相同的效果,基于这些api,我们可以实现在(A)NativeWindow上的指定区域绘制一个长方形:
#![allow(unused)]
fn main() {
unsafe fn draw_rect_on_window(nativewindow: &NativeWindow, colors: Vec<u8>, rect: ndk_glue::Rect) {
    let height = nativewindow.height();
    let width = nativewindow.width();
    let color_format = get_color_format();
    let format = color_format.0;
    let bbp = color_format.1;
    nativewindow.set_buffers_geometry(width, height, format);
    nativewindow.acquire();
    let mut buffer = NativeWindow::generate_epmty_buffer(width, height, width, format);
    let locked = nativewindow.lock(&mut buffer, &mut NativeWindow::generate_empty_rect(0, 0, width, height));
    if locked < 0 {
        nativewindow.release();
        return;
    }

    draw_rect_into_buffer(buffer.bits, colors, rect, width, height);
    let result = nativewindow.unlock_and_post();
    nativewindow.release();
}

unsafe fn draw_rect_into_buffer(bits: *mut ::std::os::raw::c_void, colors: Vec<u8>, rect: ndk_glue::Rect, window_width: i32, window_height: i32) {
    let bbp = colors.len() as u32;
    let window_width = window_width as u32;
    for i in rect.top+1..=rect.bottom {
        for j in rect.left+1..=rect.right {
            let cur = (j + (i-1) * window_width - 1) * bbp;
            for k in 0..bbp {
                *(bits.offset((cur + (k as u32)) as isize) as *mut u8) = colors[k as usize];
            }
        }
    }
}

}
这样就通过提交一个纯色像素填充的Buffer在指定的位置成功渲染出了一个长方形,不过这种方式本质上是软件绘制,性能欠佳,更好的方式是通过在Rust层封装GL在ANativeWindow上使能硬件绘制。
2 硬件绘制:
2.1 跨平台窗口系统:winit
2.1.1 Window:窗口
窗口系统最主要的目的是提供平台无关的 Window 抽象,提供一系列通用的基础方法、属性方法、游标相关方法、监控方法。winit 以 Window 类抽象窗口类型并持有平台相关的 window 实现,通过 WindowId 唯一识别一个 Window 用于匹配后续产生的所有窗口事件WindowEvent,最后通过建造者模式对外暴露实例化的能力,支持在 Rust 侧设置一些平台无关的参数(大小、位置、标题、是否可见等)以及平台相关的特定参数,基本结构如下:
#![allow(unused)]
fn main() {
// src/window.rs
pub struct Window {
    pub(crate) window: platform_impl::Window,
}

impl Window {
    #[inline]
    pub fn request_redraw(&self) {
        self.window.request_redraw()
    }

    pub fn inner_position(&self) -> Result<PhysicalPosition<i32>, NotSupportedError> {
        self.window.inner_position()
    }

    pub fn current_monitor(&self) -> Option<MonitorHandle> {
        self.window.current_monitor()
    }
}

pub struct WindowId(pub(crate) platform_impl::WindowId);

pub struct WindowBuilder {
    /// The attributes to use to create the window.
    pub window: WindowAttributes,

    // Platform-specific configuration.
    pub(crate) platform_specific: platform_impl::PlatformSpecificWindowBuilderAttributes,
}

impl WindowBuilder {
    #[inline]
    pub fn build<T: 'static>(
        self,
        window_target: &EventLoopWindowTarget<T>,
    ) -> Result<Window, OsError> {
        platform_impl::Window::new(&window_target.p, self.window, self.platform_specific).map(
            |window| {
                window.request_redraw();
                Window { window }
            },
        )
    }
}

}
在Android平台,winit暂时不支持使用给定的属性构建一个“Window”,大部分方法给出了空实现或者直接panic,仅保留了一些事件循环相关的能力,真正的窗口实现仍然从android-ndk-rs胶水层获得:当前的android-ndk-rs仅针对ANativeActivity进行了适配,通过属性宏代理了unsafe extern "C" fn ANativeActivity_onCreate(...)方法,在获得ANativeActivity指针*activity后,注入自定义的生命周期回调,在onNativeWindowCreated回调中获得ANativeWindow(封装为NativeWindow)作为当前上下文活跃的窗口。当然,android-ndk-rs的能力也支持我们在任意一个ANativeWindow上生成对应的上层窗口。
2.1.2 EventLoop:事件循环 - 上层
事件循环是整个窗口系统行为的驱动,统一响应抛出的系统任务和用户交互并将反馈渲染到窗口上形成闭环,当你需要合理地触发渲染时,最好的方式就是将指令发送给事件循环。winit中,将事件循环封装为EventLoop,使用ControlFlow控制EventLoop如何获取、消费循环中的事件,并对外提供一个EventLoopProxy代理用于作为与用户交互的媒介,支持用户通过proxy向EventLoop发送用户自定义的事件:
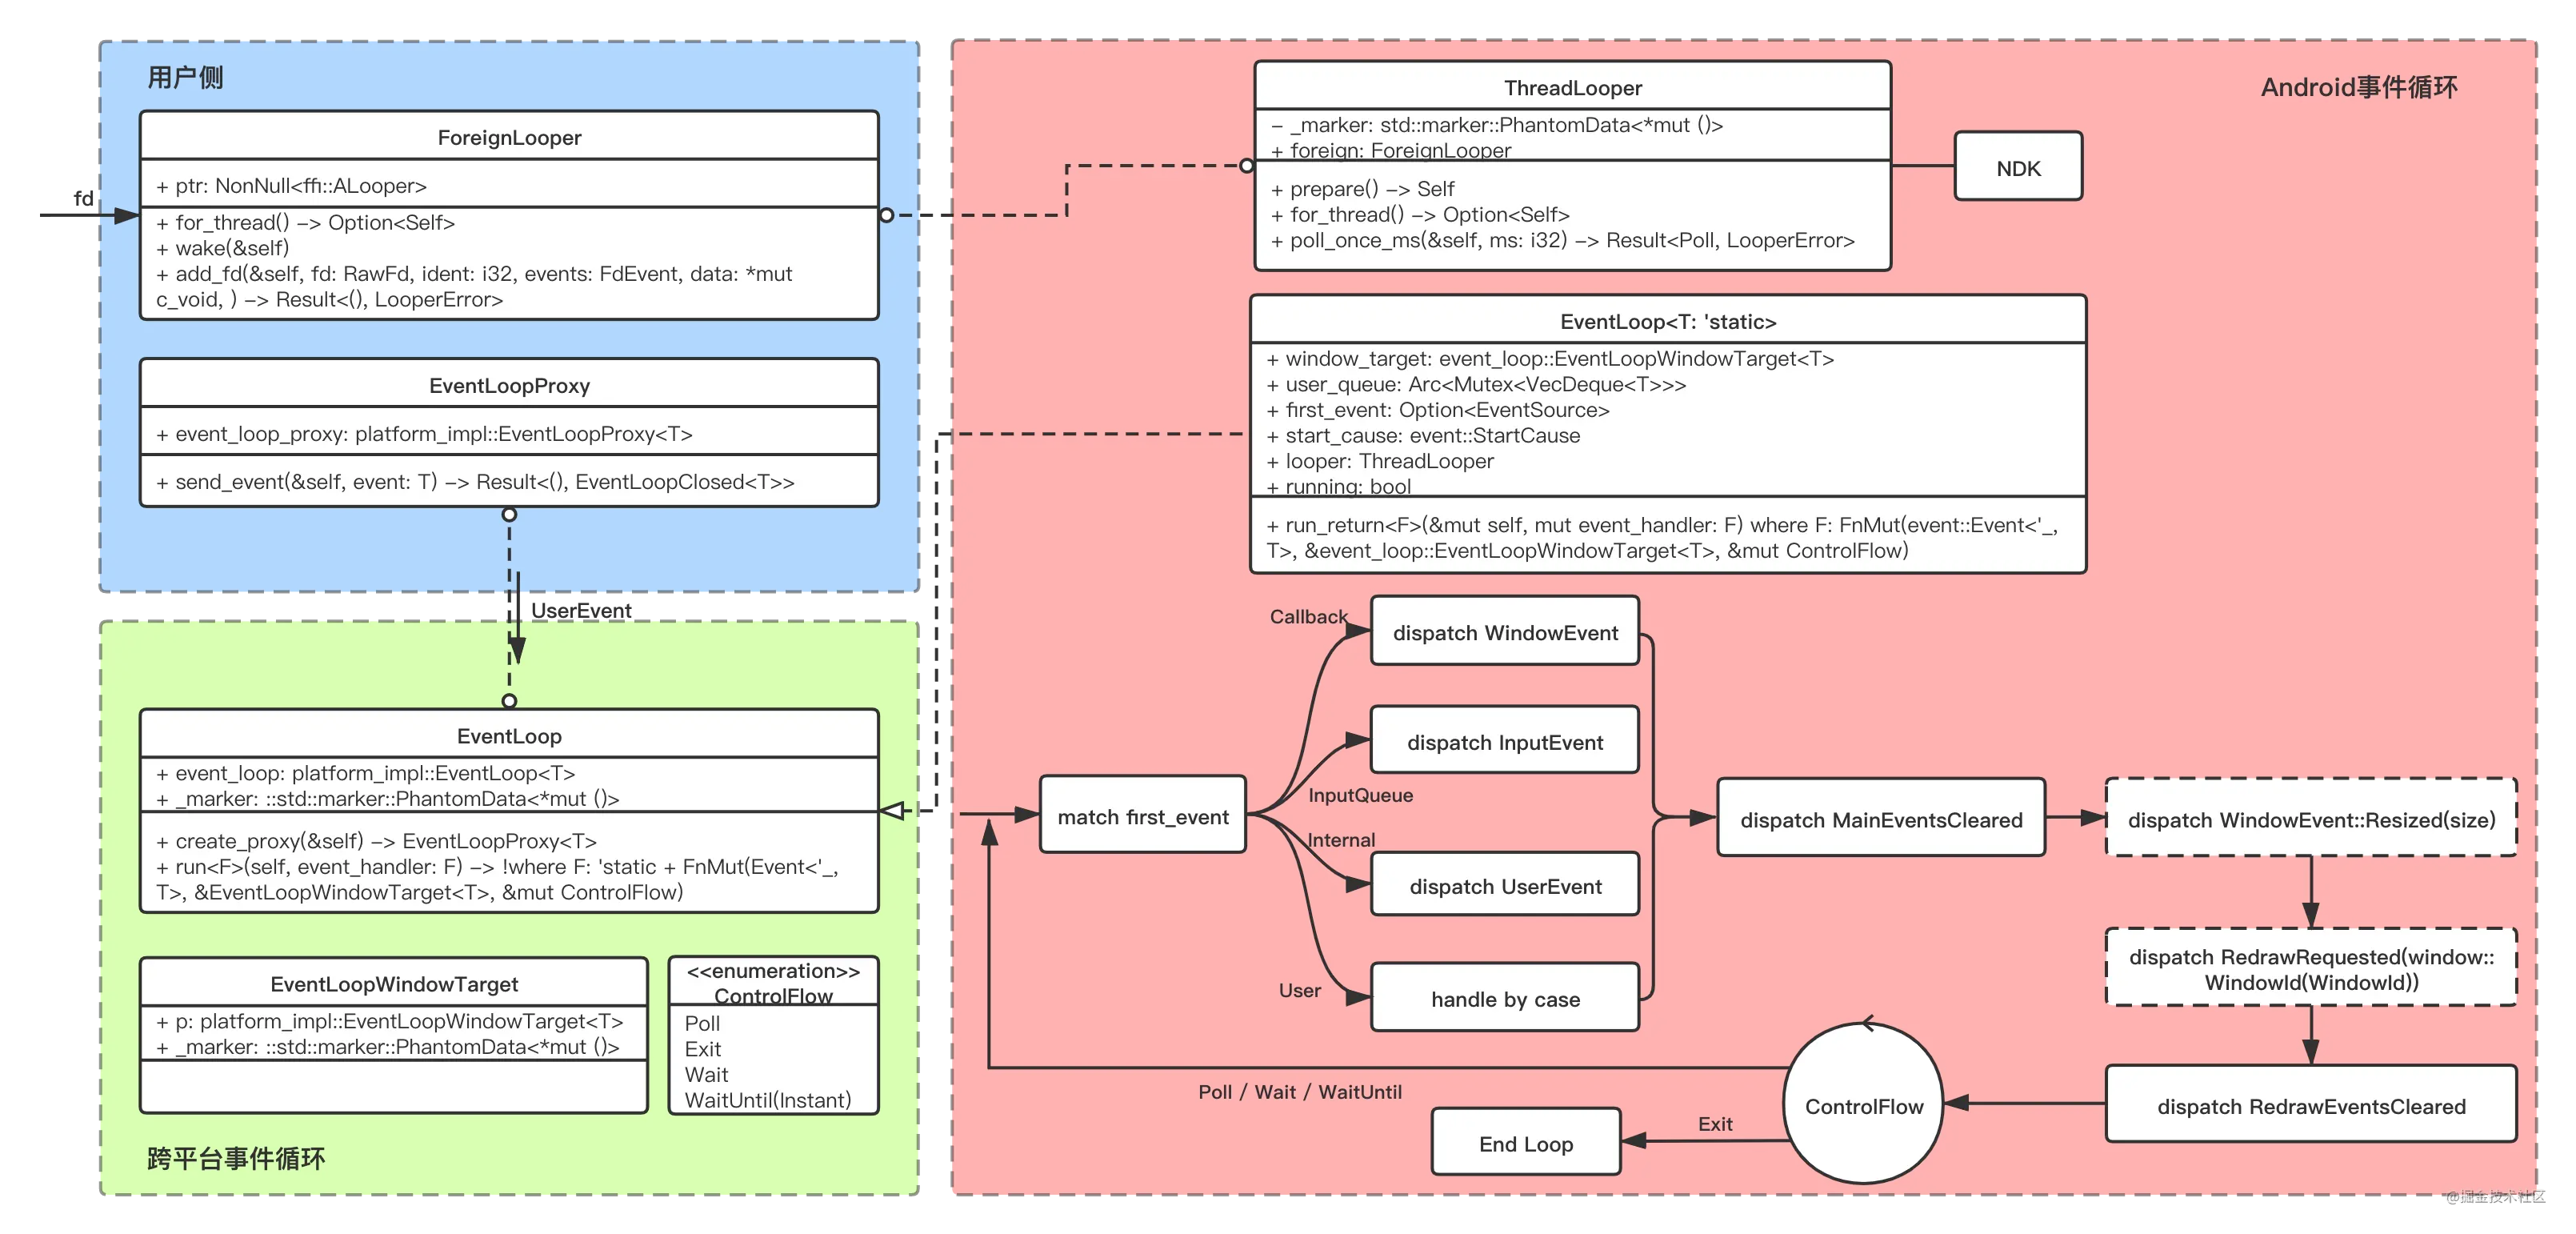
Android 平台的事件循环建立在ALooper之上,通过android-ndk-rs提供的胶水层注入的回调处理生命周期行为和窗口行为,通过代理InputQueue处理用户手势,同时支持响应用户自定义事件和内部事件。一次典型的循环根据当前first_event的类型分发处理,一次处理一个主要事件;当first_event处理完成后,触发一次MainEventsCleared事件回调给业务方,并判断是否需要触发Resized和RedrawRequested,最后触发RedrawEventsCleared事件标识所有事件处理完毕。
单次循环处理完所有事件后进入控制流,决定下一次处理事件的行为,控制流支持Android epoll多路复用,在必要时唤醒循环处理后续事件,此外,控制流提供了强制执行、强制退出的能力。事实上,android-ndk-rs就是通过添加fd的方式将窗口行为抛到EventLoop中包装成Callback事件处理:
- 首先,新建一对
fdPIPE: [RawFd; 2],并把读端加到ALooper中,指定标识符为NDK_GLUE_LOOPER_EVENT_PIPE_IDENT; - 然后,在适当的时机调用向
fd写端写入事件; - 最后,
fd写入后触发ALooper在poll时被唤醒,且得到被唤醒fd的ident为NDK_GLUE_LOOPER_EVENT_PIPE_IDENT,便可以从fd读端读出此前wake()写入的事件并进行相应的处理;
#![allow(unused)]
fn main() {
// <--1--> 挂载fd
// ndk-glue/src/lib.rs
lazy_static! {
    static ref PIPE: [RawFd; 2] = {
        let mut pipe: [RawFd; 2] = Default::default();
        unsafe { libc::pipe(pipe.as_mut_ptr()) };
        pipe
    };
}

{
    ...
    thread::spawn(move || {
        let looper = ThreadLooper::prepare();
        let foreign = looper.into_foreign();
        foreign
            .add_fd(
                PIPE[0],
                NDK_GLUE_LOOPER_EVENT_PIPE_IDENT,
                FdEvent::INPUT,
                std::ptr::null_mut(),
            )
            .unwrap();
    });
    ...
}

// <--2--> 向fd写入数据
// ndk-glue/src/lib.rs
unsafe fn wake(_activity: *mut ANativeActivity, event: Event) {
    log::trace!("{:?}", event);
    let size = std::mem::size_of::<Event>();
    let res = libc::write(PIPE[1], &event as *const _ as *const _, size);
    assert_eq!(res, size as _);
}

// <--3--> 唤醒事件循环读出事件
// src/platform_impl/android/mod.rs
fn poll(poll: Poll) -> Option<EventSource> {
    match poll {
        Poll::Event { ident, .. } => match ident {
            ndk_glue::NDK_GLUE_LOOPER_EVENT_PIPE_IDENT => Some(EventSource::Callback),
            ...
        },
        ...
    }
}

// ndk-glue/src/lib.rs
pub fn poll_events() -> Option<Event> {
    unsafe {
        let size = std::mem::size_of::<Event>();
        let mut event = Event::Start;
        if libc::read(PIPE[0], &mut event as *mut _ as *mut _, size) == size as _ {
            Some(event)
        } else {
            None
        }
    }
}

}
2.2 跨平台egl上下文:glutin
我们有了跨平台的 OpenGL(ES) 用于描述图形对象,也有了跨平台的窗口系统 winit 封装窗口行为,但是如何理解图形语言并将其渲染到各个平台的窗口上?这就是egl发挥的作用,它实现了OpenGL(ES)和底层窗口系统之间的接口层。在rust-windowing项目中,glutin工程承接了这个职责,以上下文的形式把窗口系统winit和gl关联了起来。
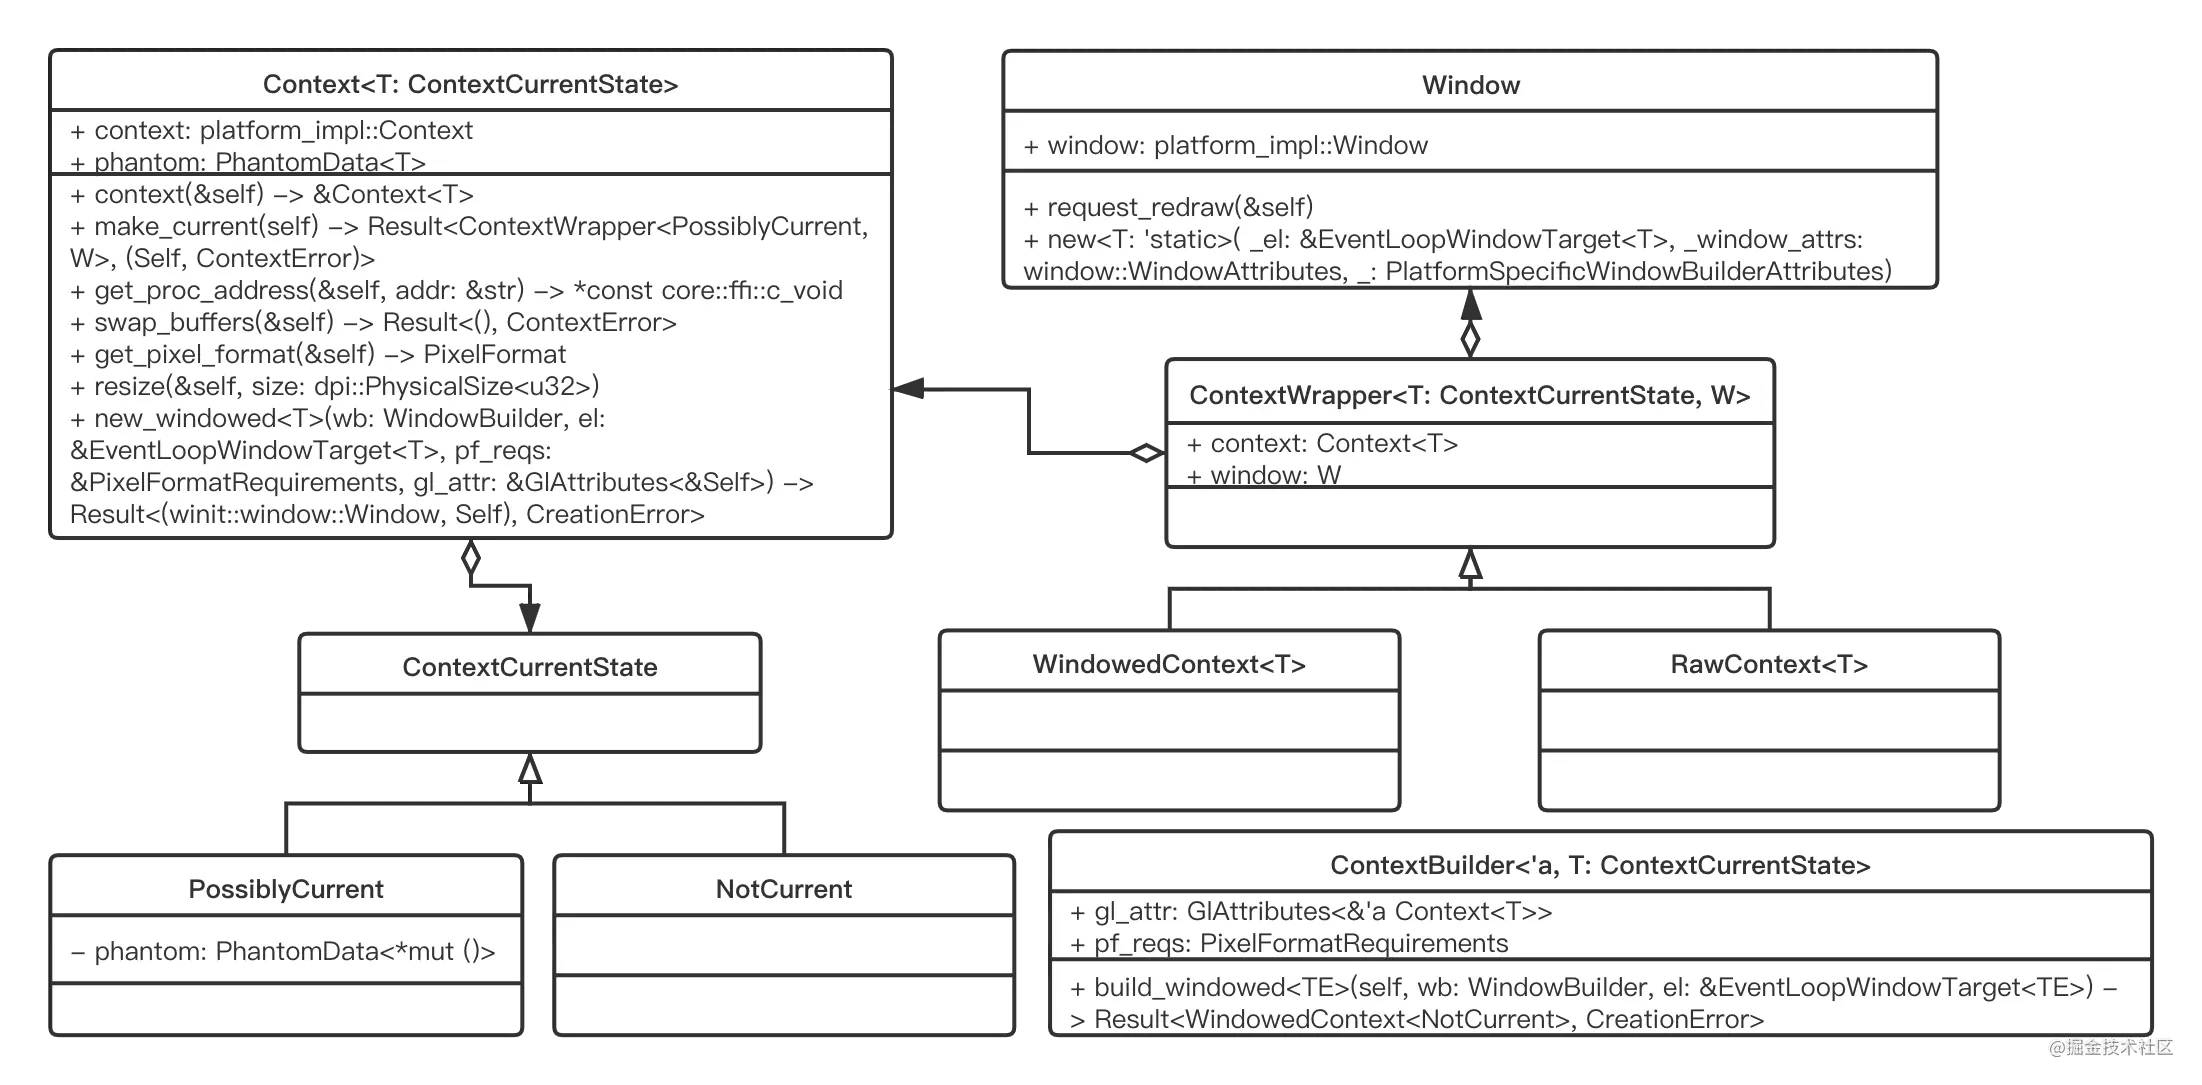
Context是gl的上下文环境,全局可以有多个gl上下文,但是一个线程同时只能有一个活跃的上下文,使用ContextCurrentState区分这一状态。glutin中Context可关联零个或多个Window,当Context与Window相关联时,使用ContextWrapper类,ContextWrapper使得可以方便地在上下文中同时操作gl绘制以及Window渲染。在其上衍生出两个类型:
RawContext:Context与Window虽然关联但是分开存储;WindowedContext:同时存放相互关联的一组Context和Window。常见的场景下WindowedContext更加适用,通过ContextBuilder指定所需的gl属性和像素格式就可以构造一个WindowedContext,内部会初始化egl上下文,并基于持有的EglSurfaceType类型的 window 创建一个eglsurface作为后续gl指令绘制(draw)、回读(read)的作用目标(指定使用该surface上的缓冲)。
2.3 硬件绘制的例子:
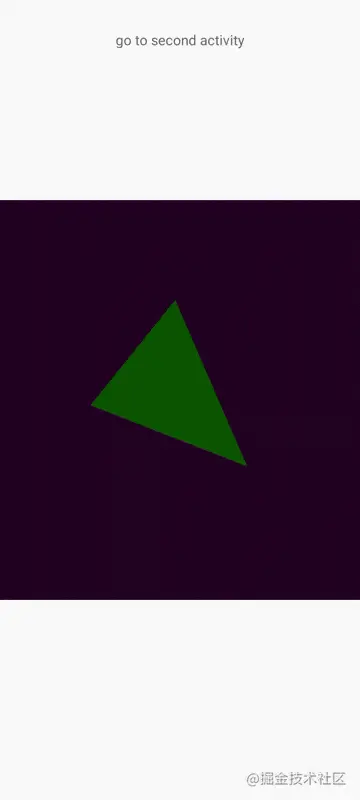
基于 winit 和 glutin 提供的能力,使用 Rust 进行渲染的准备工作只需基于特定业务需求去创建一个glutin 的Context,通过 Context 中创建的 egl上下文可以调用gl api进行绘制,而window让我们可以掌控渲染流程,在需要的时候(比如基于EventLoop重绘指令或者一个简单的无限循环)下发绘制指令。简单地实现文章开头的三角形demo动画效果如下:
#![allow(unused)]
fn main() {
fn render(&mut self, gl: &Gl) {
    let time_elapsed = self.startTime.elapsed().as_millis();
    let percent = (time_elapsed % 5000) as f32 / 5000f32;
    let angle = percent * 2f32 * std::f32::consts::PI;

    unsafe {
        let vs = gl.CreateShader(gl::VERTEX_SHADER);
        gl.ShaderSource(vs, 1, [VS_SRC.as_ptr() as *const _].as_ptr(), std::ptr::null());
        gl.CompileShader(vs);
        let fs = gl.CreateShader(gl::FRAGMENT_SHADER);
        gl.ShaderSource(fs, 1, [FS_SRC.as_ptr() as *const _].as_ptr(), std::ptr::null());
        gl.CompileShader(fs);
        let program = gl.CreateProgram();
        gl.AttachShader(program, vs);
        gl.AttachShader(program, fs);
        gl.LinkProgram(program);
        gl.UseProgram(program);
        gl.DeleteShader(vs);
        gl.DeleteShader(fs);
        let mut vb = std::mem::zeroed();
        gl.GenBuffers(1, &mut vb);
        gl.BindBuffer(gl::ARRAY_BUFFER, vb);
        let vertex = [
            SIDE_LEN * (BASE_V_LEFT+angle).cos(), SIDE_LEN * (BASE_V_LEFT+angle).sin(),  0.0,  0.4,  0.0,
            SIDE_LEN * (BASE_V_TOP+angle).cos(),  SIDE_LEN * (BASE_V_TOP+angle).sin(),  0.0,  0.4,  0.0,
            SIDE_LEN * (BASE_V_RIGHT+angle).cos(), SIDE_LEN * (BASE_V_RIGHT+angle).sin(),  0.0,  0.4,  0.0,
        ];

        gl.BufferData(
            gl::ARRAY_BUFFER,
            (vertex.len() * std::mem::size_of::<f32>()) as gl::types::GLsizeiptr,
            vertex.as_ptr() as *const _,
            gl::STATIC_DRAW,
        );

        if gl.BindVertexArray.is_loaded() {
            let mut vao = std::mem::zeroed();
            gl.GenVertexArrays(1, &mut vao);
            gl.BindVertexArray(vao);
        }

        let pos_attrib = gl.GetAttribLocation(program, b"position\0".as_ptr() as *const _);
        let color_attrib = gl.GetAttribLocation(program, b"color\0".as_ptr() as *const _);
        gl.VertexAttribPointer(
            pos_attrib as gl::types::GLuint,
            2,
            gl::FLOAT,
            0,
            5 * std::mem::size_of::<f32>() as gl::types::GLsizei,
            std::ptr::null(),
        );

        gl.VertexAttribPointer(
            color_attrib as gl::types::GLuint,
            3,
            gl::FLOAT,
            0,
            5 * std::mem::size_of::<f32>() as gl::types::GLsizei,
            (2 * std::mem::size_of::<f32>()) as *const () as *const _,
        );

        gl.EnableVertexAttribArray(pos_attrib as gl::types::GLuint);
        gl.EnableVertexAttribArray(color_attrib as gl::types::GLuint);
        gl.ClearColor(1.3 * (percent-0.5).abs(), 0., 1.3 * (0.5 - percent).abs(), 1.0);
        gl.Clear(gl::COLOR_BUFFER_BIT);
        gl.DrawArrays(gl::TRIANGLES, 0, 3);
    }
}

}
3 Android - Rust JNI开发
以上 Rust UI渲染部分完全运行在Rust上下文中(包括对c++的封装),而实际渲染场景下很难完全脱离Android层进行UI的渲染或不与Activity等容器进行交互。所幸Rust UI渲染主要基于(A)NativeWindow,而Android Surface在c++的对应类实现了ANativeWindow,ndk也提供了ANativeWindow_fromSurface方法从一个surface获得ANativeWindow对象,因而我们可以通过JNI的方式使用Rust在Android层的Surface上进行UI渲染:
#![allow(unused)]
fn main() {
// Android

surface_view.holder.addCallback(object : SurfaceHolder.Callback2 {

    override fun surfaceCreated(p0: SurfaceHolder) {
        RustUtils.drawColorTriangle(surface, Color.RED)
    }

    override fun surfaceChanged(p0: SurfaceHolder, p1: Int, p2: Int, p3: Int) {}

    override fun surfaceDestroyed(p0: SurfaceHolder) {}

    override fun surfaceRedrawNeeded(p0: SurfaceHolder) {}

})

// Rust
pub unsafe extern fn Java_com_example_rust_1demo_RustUtils_drawColorTriangle__Landroid_view_Surface_2I(env: *mut JNIEnv, _: JClass, surface: jobject, color: jint) -> jboolean {
    println!("call Java_com_example_rust_1demo_RustUtils_drawColor__Landroid_view_Surface_2I");
    ndk_glue::set_native_window(NativeWindow::from_surface(env, surface));
    runner::start();
    0
}

}
需要注意,由于EventLoop是基于ALooper的封装,调用Rust实现渲染时需要确保调用在有Looper的线程(比如HandlerThread中),或者在Rust渲染前初始化时为当前线程准备ALooper。
总结
使用Rust在Android上进行UI渲染的可行性已经得证,但是它的性能表现究竟如何?未来又将在哪些业务上落地?这些仍待进一步探索。